Learning how to add columns in Word lets you create newsletters, brochures, and newspaper-style pages without relying on text boxes. You can also combine columns with correctly configured margin settings in Word to keep the layout balanced.
In this guide, you’ll learn three methods for adding preset columns, customising their width and spacing, and applying columns to selected text or part of a document.
What Are Columns in Word?
Columns divide a page into vertical sections. Text flows from the top of the first column to the bottom, then continues at the top of the next column.
Page columns work well for:
- Newspaper-style articles
- Newsletters and magazines
- Brochures and flyers
- Reports containing short, scannable sections
Word uses one full-width column by default. When you change the column layout, the text automatically reflows across the available sections. You can then use the guide on how to align text in Word to control how paragraphs sit inside each column.
Watch the Video Tutorial
If you prefer to see this in action, the full video walkthrough is below, showing each method step by step.
How to Add Columns in Word: Step-by-Step
The process depends on how much control you need. Use a preset for a fast two- or three-column layout, open More Columns for exact measurements, or select text when only one part of the document needs columns.
Method 1: How to Add Columns in Word Using a Preset
The fastest way to learn how to add columns in Word is to use the preset layouts. Word includes options for one, two, three, left-weighted, and right-weighted columns.
Choose a Preset Column Layout
- Place the cursor where you want the column layout to begin.
- Open the Layout tab.
- Select Columns in the Page Setup group.
- Choose Two or Three.
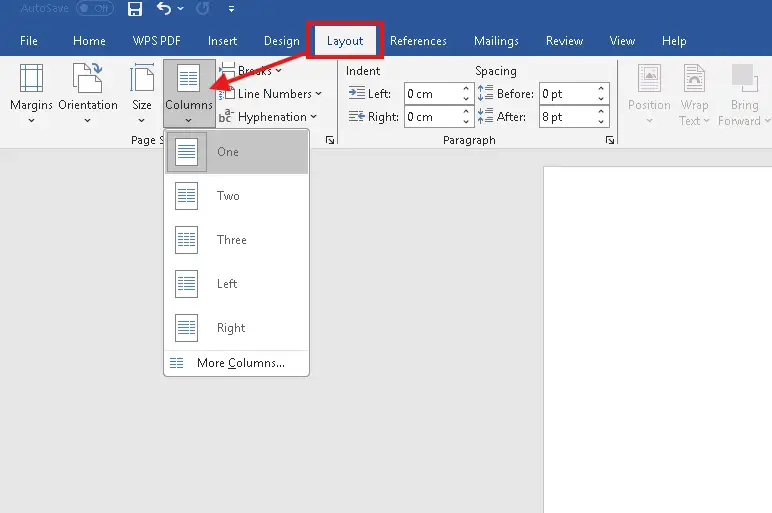
? Done. Word splits the text across the selected number of columns and continues the content from one column to the next.
Choose an Uneven Column Layout
The Left and Right presets create two columns with different widths. They are useful when one side contains short notes, dates, quotations, or supporting information.
- Left creates a narrow column on the left and a wider column on the right.
- Right creates a wider column on the left and a narrow column on the right.
- One returns the section to the standard full-width layout.
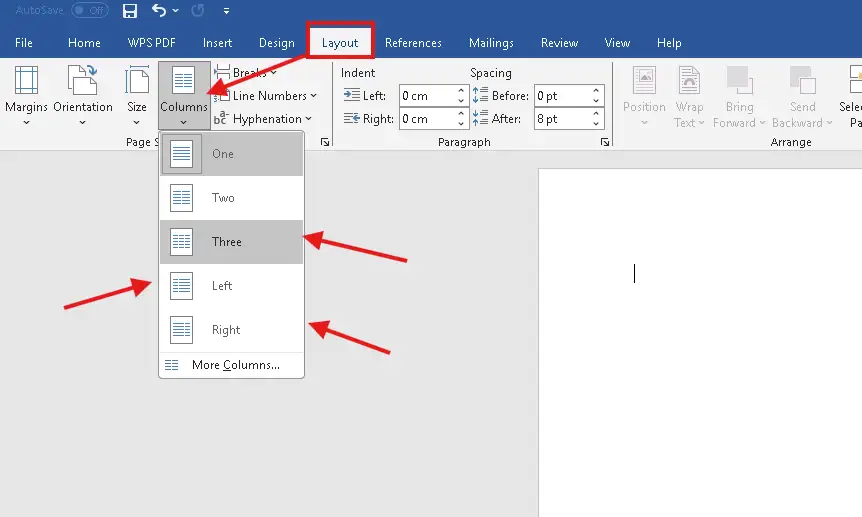
? The page now uses the selected preset. Choose One whenever you need to remove the column layout.
Method 2: How to Add Columns in Word with Custom Settings
Use More Columns when you need exact control over the number, width, and spacing of your columns. This method is more precise than choosing a preset.
Open the More Columns Dialog
- Open the Layout tab.
- Select Columns.
- Select More Columns.
- Enter the required value in the Number of columns box.
- Adjust the width and spacing values.
- Select an option from Apply to.
- Select OK.
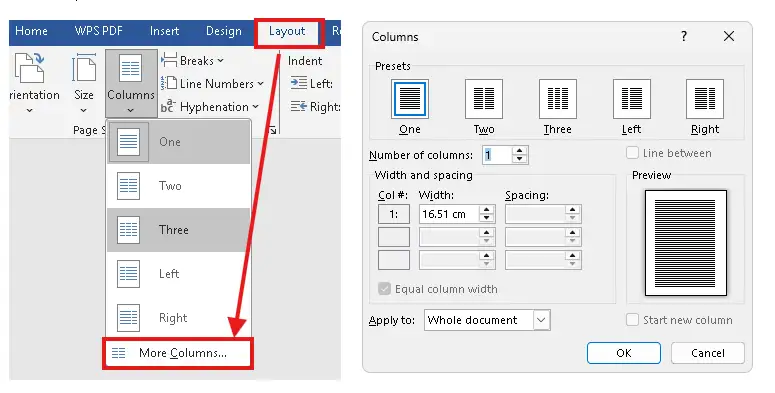
? Your document now uses the custom measurements. This gives you more control over narrow pages and image-heavy layouts.
Adjust Column Width and Spacing
Select Equal column width when every column should have the same measurements. Clear it when one column needs to be wider than another, then enter separate width and spacing values.
- Increase spacing when the text feels cramped.
- Reduce the number of columns when lines become too short.
- Adjust the page margins before making individual columns extremely narrow.
- Use a vertical dividing line only when the columns need a clear visual boundary — for other separators, see how to insert a vertical line in Word.
? The best layout leaves enough white space between columns for the reader to follow each line comfortably.
Method 3: How to Add Columns in Word to Selected Text
You do not need to format the entire document. When learning how to add columns in Word, selecting the text first is the safest way to limit the layout to a specific passage.
Apply Columns to a Text Selection
- Select the paragraphs that should use columns.
- Open the Layout tab.
- Select Columns.
- Choose a preset or select More Columns.
- Confirm that Selected text appears in the Apply to box when using the dialog.
- Select OK.
? Only the selected passage changes. The text before and after it remains full width.
Apply Columns from the Cursor Forward
Place the cursor where the column section should begin, open More Columns, and choose This point forward from the Apply to menu. Word keeps the earlier pages unchanged and applies the new layout after the cursor.
? This works well when an introduction uses full-width text and the main article uses columns.
Which Method Should You Use?
| Situation | Best Method |
|---|---|
| Creating a quick newsletter | Choose a two- or three-column preset |
| Controlling exact widths and spacing | Open More Columns |
| Formatting one passage only | Select the text before adding columns |
| Starting columns halfway through a document | Use This point forward |
For most documents, start with the Two preset. Use custom settings only when the default width or spacing makes the page difficult to read.
Columns vs Table Columns: Choose the Right Tool
Page columns and table columns serve different purposes. Page columns make continuous text flow from one vertical section to the next. A table keeps information inside independent cells.
| Use Page Columns For | Use a Table For |
|---|---|
| Newsletters and articles | Side-by-side comparisons |
| Continuous reading order | Prices, forms, and aligned data |
| Newspaper-style layouts | Independent content areas |
Use page columns when the reader should finish one column and continue into the next. Use a table when the content must remain aligned in separate cells — see how to insert a table in Word for that layout.
Common Problems with Columns in Word
Most column problems come from an incorrect text selection, an unwanted break, or the wrong Apply to setting. Check these four issues before rebuilding the layout.
The Whole Document Changed
Undo the change, select only the required text, and apply the column layout again. Alternatively, open More Columns and choose This point forward instead of Whole document.
Text Moves to the Next Column Too Early
Open the Home tab and select Show/Hide ¶. Look for an unwanted column break or page break, then remove it carefully. For a complete walkthrough, see how to remove a page break in Word.
An Image Does Not Fit Inside a Column
Resize the image so it fits within the available column width. Use In Line with Text for predictable placement, especially when the surrounding text must continue in reading order.
The Final Column Is Much Shorter
Review the layout in Print Layout and check for manual breaks. A short final column can also be normal when there is not enough content to fill the remaining space evenly.
Pro Tips for Using Columns in Word
- Use two columns for most newsletters and reports. They give the page structure without making each line too short.
- Keep headings short so they do not wrap across several lines inside a narrow column.
- Use Print Layout and Print Preview to judge the final spacing accurately.
- Resize images before placing them in narrow columns — for more positioning control, see how to move an image freely in Word.
- Avoid using repeated spaces or separate text boxes to imitate flowing columns.
- Return to Layout ? Columns ? One when you need a standard full-width section.
FAQs
How do I add columns in Word?
To learn how to add columns in Word, open the Layout tab, select Columns, and choose a preset. Use More Columns for custom width and spacing settings.
How do I make two columns in Word?
Open Layout, select Columns, and choose Two. Word will flow the text from the first column into the second.
Can I apply columns to only part of a document?
Yes. Select the required text before choosing the column layout. Word will keep the surrounding text at its existing width.
How do I change the space between columns?
Select Layout ? Columns ? More Columns, then change the value under Spacing. Select OK to apply it.
How do I remove columns in Word?
Place the cursor in the column section, open Layout ? Columns, and choose One. Check the Apply to setting if only part of the document should change.
What is the difference between Left and Right columns?
The Left preset creates a narrow left column and a wide right column. The Right preset reverses those widths.
Why is my text not flowing into the next column?
Check for an unwanted page break, column break, or empty paragraphs. Turn on Show/Hide ¶ to reveal those formatting marks.
Should I use columns or a table in Word?
Use page columns for continuous newsletter-style text. Use a table when information must remain in independent aligned cells; see how to insert a table in Word for that method.
Conclusion
Knowing how to add columns in Word gives you a faster way to build newsletters, brochures, and structured page layouts. Start with a preset, then open More Columns when you need exact control.
Select the text first when only one passage needs columns, and always check the result in Print Layout. Clean spacing matters more than fitting the maximum number of columns onto the page.
For a more polished page, finish the layout by learning how to add lines in Word for clear section dividers.
Related Tutorials

Recent Microsoft Word Tutorials

Looking for more help with Microsoft Word? Browse all step-by-step Word tutorials covering formatting, layout, pages, and document setup.
? View all Microsoft Word tutorials: https://wordmadeeasy.halmanweb.com/microsoft-word/
? Need more support – check out the official guidance: https://support.microsoft.com/en-au

Prefer watching instead of reading? Many Word tutorials are also available as short, step-by-step videos on the Word Made Easy YouTube channel.