Microsoft Word inserts page breaks to control where content starts on a new page — but when you need to remove a page break in Word, the wrong method can leave blank pages, broken layouts, or formatting issues that are hard to track down. If you’re cleaning up a report, thesis, or resume and the document keeps jumping to a new page, see the guide on how to remove formatting marks in Word for related cleanup tips before you start.
In this guide, you’ll learn how to display hidden page breaks, remove them one at a time or all at once, and fix the sneaky “Page Break Before” setting that causes breaks even when none appear to exist.
What Is a Page Break in Word?
A page break tells Word to move everything after a certain point onto a new page. Unlike a paragraph that simply runs out of room, a page break is a deliberate instruction. There are two types, and they behave very differently when you try to remove them.
- Manual page breaks — inserted by you (or a previous editor) to force a section onto a new page.
- Automatic page breaks — created by Word whenever content reaches the bottom of a page.
- Manual breaks can be deleted. Automatic breaks adjust on their own as content changes.
Watch the Video Tutorial
If you prefer to see this in action, the full video walkthrough is below, showing each method step by step.
How to Display Page Breaks in Word
Before you remove anything, make page breaks visible. Otherwise you’re guessing.
Steps:
- Open your Word document.
- Click the Home tab.
- In the Paragraph group, click Show/Hide (¶).
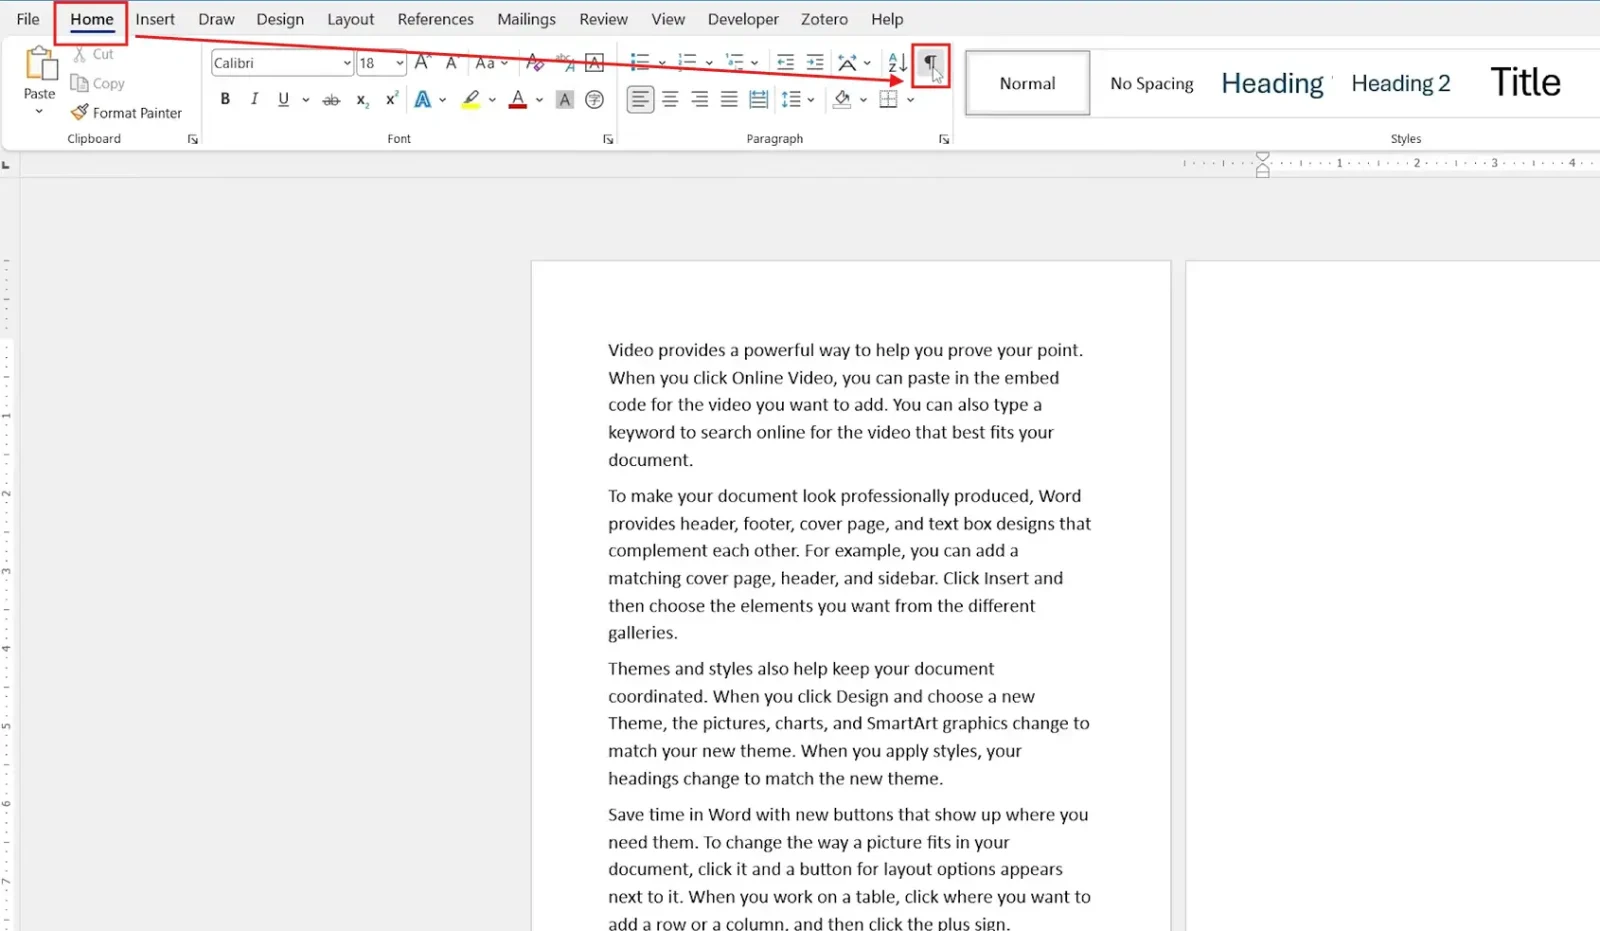
? Word now shows every page break, paragraph mark, space, and section break as a visible symbol. A manual page break appears as a dotted line labelled “Page Break”.
How to Remove a Page Break in Word: Step-by-Step
Word gives you four ways to remove a page break, depending on whether you’re fixing one break, dozens of them, or a hidden setting that’s causing the problem. All four work in Word 2016, 2019, 2021, and Microsoft 365.
Method 1: How to Remove a Page Break in Word Using Backspace
The fastest method for a single break.
Steps:
- Click immediately to the left of the “Page Break” marker.
- Press Backspace.
? That’s it. The break disappears and your text shifts back into place. No menus, no dialog boxes.
Method 2: How to Remove a Page Break in Word by Deleting It Directly
Useful when you want to confirm exactly which break you’re removing before it’s gone.
Steps:
- Make sure Show/Hide (¶) is switched on.
- Click anywhere on the “Page Break” line to select it — it highlights fully.
- Press Delete.
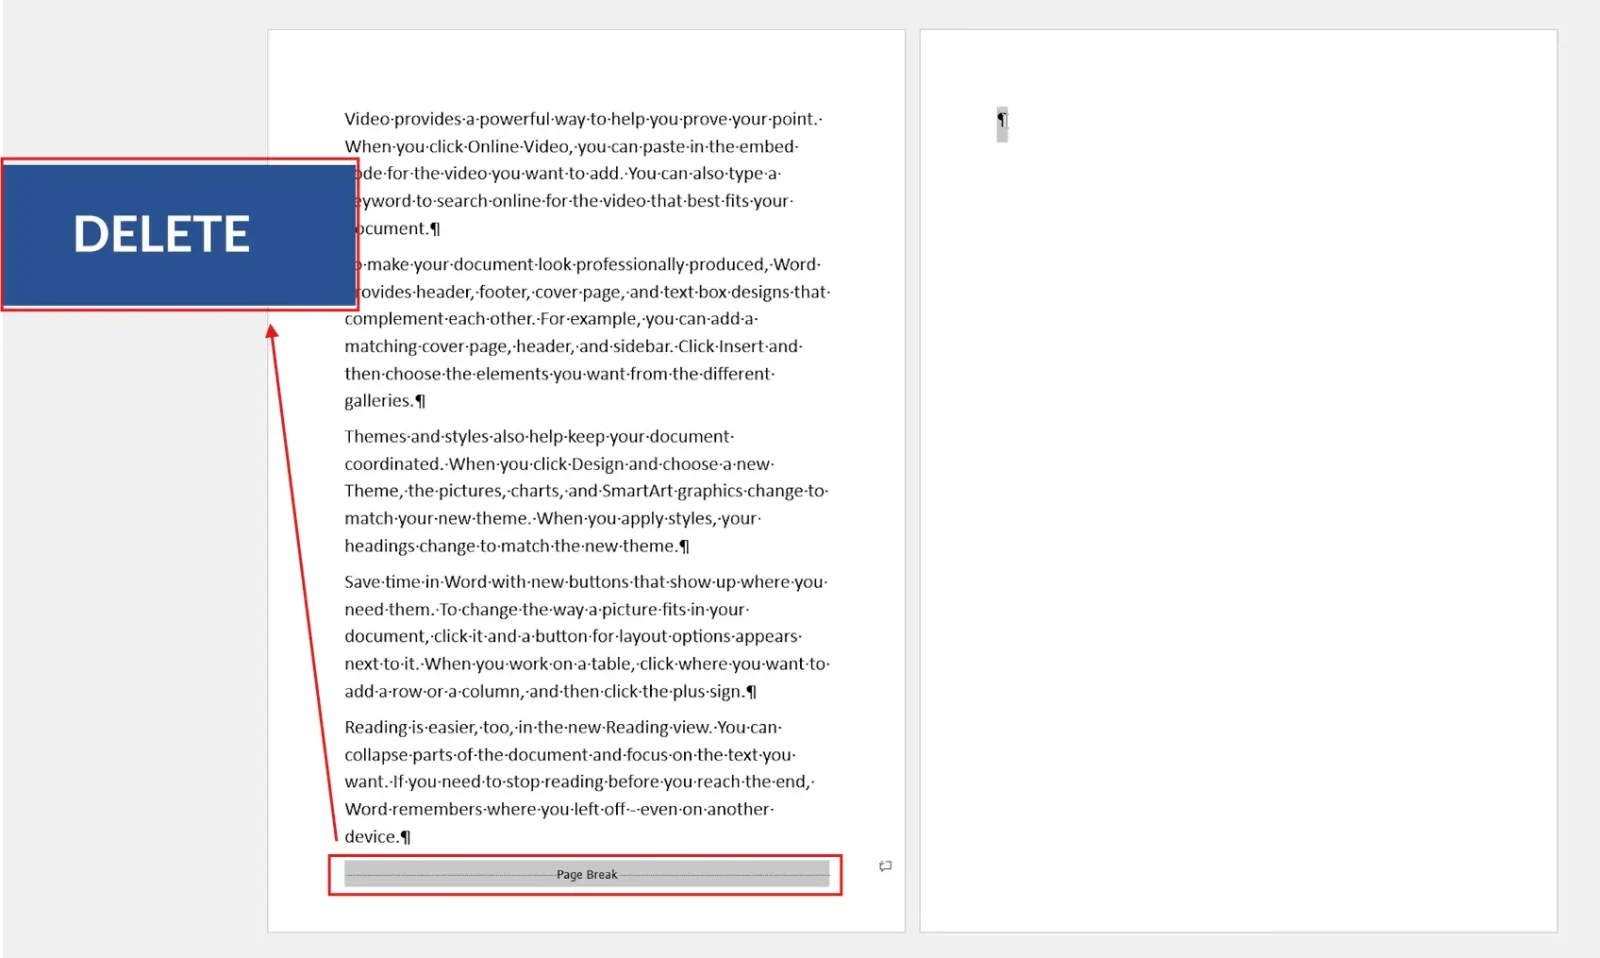
? The break is removed instantly, and you’ve seen exactly what you deleted — useful if a document has several breaks close together.
Method 3: How to Remove a Page Break in Word Using Find and Replace
Manually deleting breaks one by one doesn’t scale. If a long document has page breaks scattered throughout — common in documents pasted from other sources — Find and Replace clears all of them in one go. This is especially useful if you’re restructuring a long report — pair it with the guide on how to create a table of contents in Word once the layout is clean.
Steps:
- Press Ctrl + H to open Find and Replace.
- In Find what, type:
^m- Leave Replace with empty.
- Click Replace All.
? Word strips out every manual page break in the document at once. For a 50-page report, this takes about two seconds.
Method 4: How to Remove a Page Break in Word Using “Page Break Before”
Sometimes a paragraph jumps to a new page even with no visible break, no symbol, nothing Find and Replace can catch. The cause is a paragraph setting called Page Break Before — Word starts that paragraph on a fresh page automatically, every time. Headings are frequent culprits here, especially in documents using styled chapter headings — see the guide on how to create automatic chapters in Microsoft Word if your document relies on heading styles.
Steps:
- Click into the paragraph that’s jumping to a new page.
- Click the small arrow in the bottom-right of the Paragraph group.
- Open the Line and Page Breaks tab.
- Untick Page break before.
- Click OK.
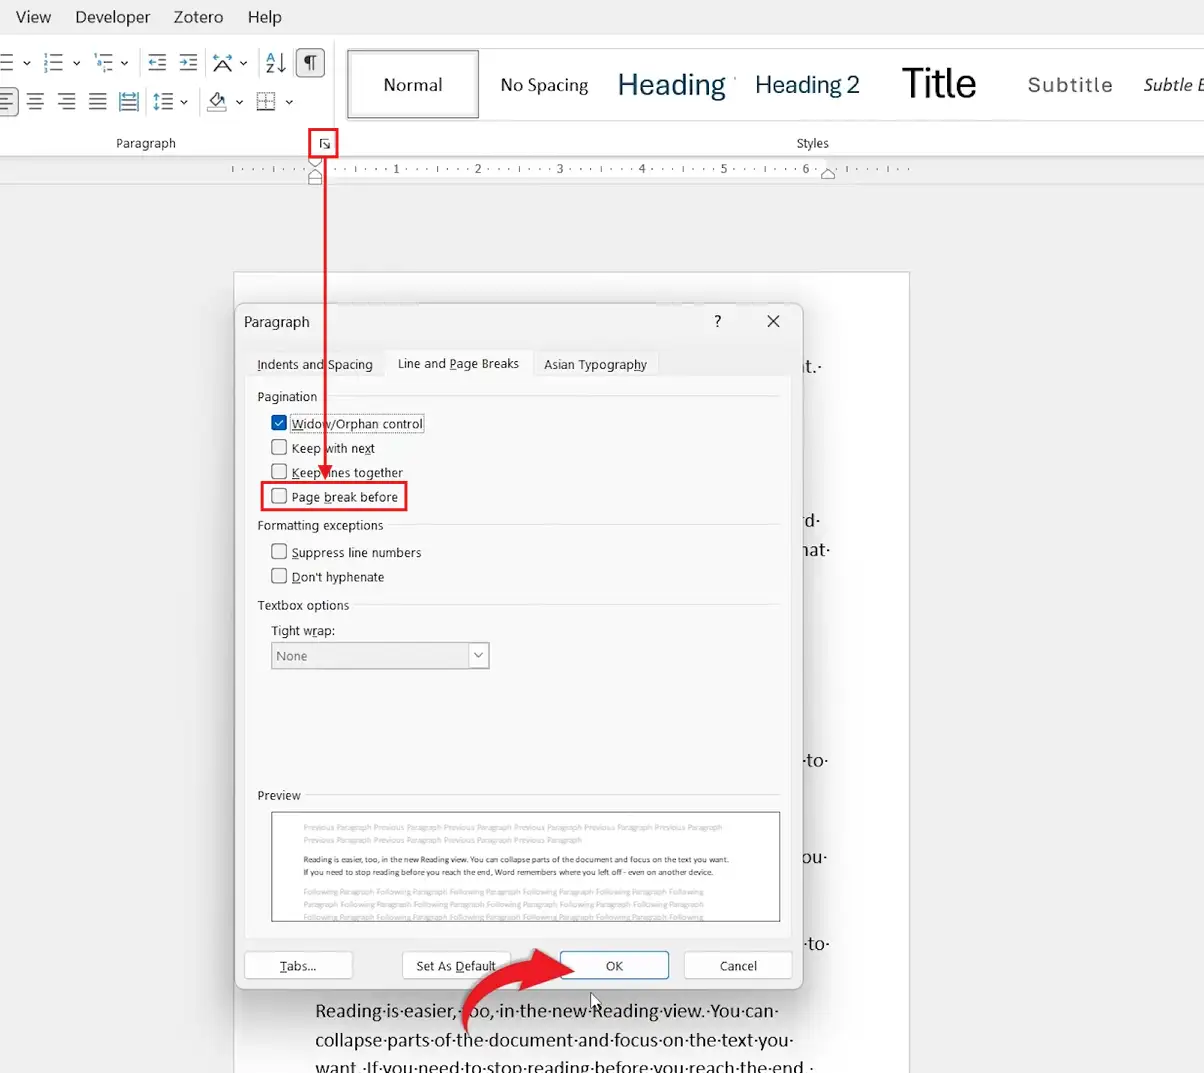
? The paragraph snaps back to its normal position immediately. No menus, no clicks needed afterwards — the change applies the moment you hit OK.
Which Method Should You Use?
- One break, quick fix? Use Method 1 (Backspace).
- Want to confirm what you’re deleting first? Use Method 2 (Select and Delete).
- Long document with breaks scattered everywhere? Use Method 3 (Find and Replace).
- No visible break, but text still starts on a new page? Use Method 4 (Page Break Before).
Common Problems When Removing Page Breaks in Word
The page break won’t delete
Turn on Show/Hide (¶) first. You can’t reliably select or delete what you can’t see.
A blank page remains after deleting the break
Extra paragraph marks or a leftover section break are usually the cause. Delete the empty paragraph marks one at a time, or see the guide on how to delete an empty page in Microsoft Word for the full fix.
Text still starts on a new page after deleting the break
That’s Page Break Before, not a manual break. Use Method 4 above.
Find and Replace doesn’t remove anything
The document likely contains section breaks rather than page breaks. Section breaks control page layout (margins, orientation, headers) as well as starting a new page, and Word treats them separately from manual page breaks.
Pro Tips for Removing Page Breaks in Word
- Run Find and Replace with
^mbefore formatting a document someone else wrote — it’s the fastest way to clear inherited breaks. - Leave Show/Hide (¶) on while editing long documents. It costs nothing and saves you guessing later.
- If removing breaks leaves stray blank pages at the end of a document, see the guide on how to delete an extra page in Word — and if you’re tidying things up, double-check section breaks too — they’re a different fix.
- Word treats Ctrl + Enter as the shortcut for inserting a manual page break — useful to know if you’re trying to avoid creating new ones while editing.
FAQs
How do I remove a page break in Word?
Turn on Show/Hide (¶), click the page break marker, and press Backspace or Delete.
How do I remove all page breaks in Word at once?
Press Ctrl + H, type ^m in Find what, leave Replace with blank, and click Replace All.
Why does my text still start on a new page after I delete the page break?
The paragraph has Page Break Before enabled in its paragraph settings. Untick it under Line and Page Breaks.
What’s the difference between a page break and a section break?
A page break only starts a new page. A section break can also change page layout — margins, orientation, headers and footers — for the new section.
Can I remove automatic page breaks in Word?
No. Automatic page breaks are generated by Word based on page size and content length, and adjust on their own as you edit.
Why is there a blank page I can’t get rid of?
Usually a stray paragraph mark or section break at the end of the document. Turn on Show/Hide (¶) and delete the empty marks directly.
How do I stop Word adding a page break before a heading?
Open the heading’s paragraph settings, go to Line and Page Breaks, and untick Page Break Before. This is common with built-in heading styles.
Will removing a page break delete my text?
No. Removing a page break only removes the break itself — your text shifts position but nothing is deleted.
Conclusion
Most of the time, you can remove a page break in Word with a single Backspace. The other three methods exist for the cases that aren’t that simple — bulk cleanups, hidden Page Break Before settings, and blank pages that won’t budge.
Turn on Show/Hide (¶) before you start, work through the method that matches your situation, and check the layout once you’re done — for a polished final result, also check your document margins in Word are still set correctly after any large structural edits.
Related Tutorials
- How to Delete an Extra Page in Word
- How to Delete an Empty Page in Microsoft Word
- How to Remove Page Numbers in Word

Recent Microsoft Word Tutorials

Looking for more help with Microsoft Word? Browse all step-by-step Word tutorials covering formatting, layout, pages, and document setup.
? View all Microsoft Word tutorials: https://wordmadeeasy.halmanweb.com/microsoft-word/
? Need more support – check out the official guidance: https://support.microsoft.com/en-au

Prefer watching instead of reading? Many Word tutorials are also available as short, step-by-step videos on the Word Made Easy YouTube channel.