You can insert a table in Word three ways — the grid selector, the Insert Table dialog, and Draw Table — and pick the one that fits the job. Tables turn cluttered text into clean, readable structure for schedules, reports, invoices, and academic work. This works in Word 2016, 2019, 2021, and Microsoft 365.
In this guide, you’ll learn three easy methods to insert a table in Word, plus how to resize, distribute rows and columns evenly, and add rows or columns after the table exists.
Why Use Tables in Word?
Tables organise information into rows and columns so readers scan it fast. They’re ideal for:
- Schedules and timetables
- Comparisons and pricing
- Reports and invoices
- Academic and form layouts
Watch the Video Tutorial
If you prefer to see this in action, the full video walkthrough is below, showing each method step by step.
How to Insert a Table in Word: Step-by-Step
Three methods cover every situation — grid for speed, dialog for control, Draw Table for custom shapes.
Method 1: How to Insert a Table in Word Using the Grid Selector
The fastest, most beginner-friendly method.
Steps
- Go to the Insert tab.
- Click Table.
- Hover over the grid and highlight the rows and columns you want (for example, 3×3).
- Click once to insert the table.
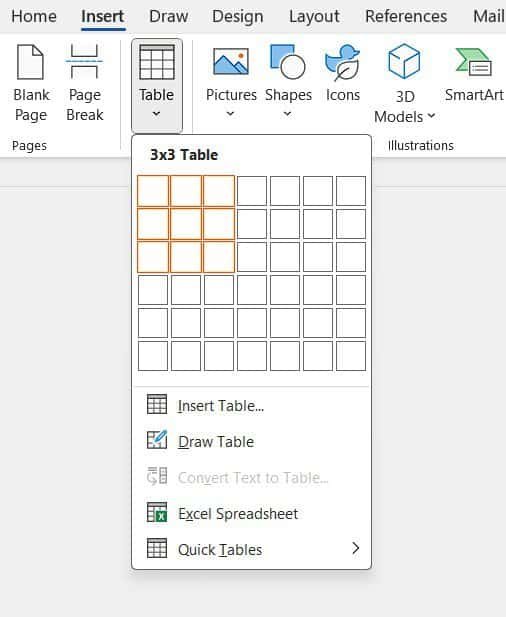
? The table drops straight in. Best for small tables where speed beats precision.
Method 2: How to Insert a Table in Word Using the Insert Table Dialog
This gives precise control over size and column behaviour.
Steps
- Click Insert ? Table ? Insert Table.
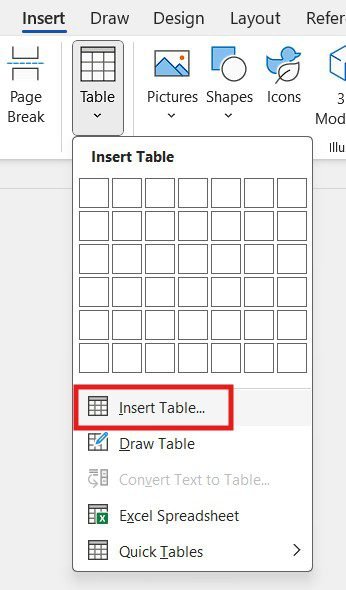
- Enter the number of columns and rows.
- Choose an AutoFit behaviour: AutoFit to Contents (fits the text), AutoFit to Window (fills page width), or Fixed Column Width (precise sizing).
- Click OK.
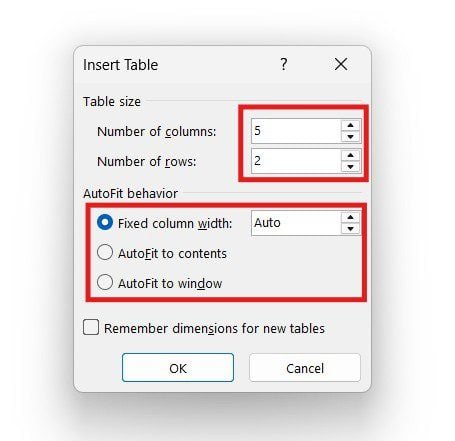
? AutoFit keeps layout consistent, which matters for reports and forms — and if you need people to type into set fields, take it further and create a fillable form in Word.
Method 3: How to Insert a Table in Word by Drawing It Manually
The most flexible method — ideal for uneven or custom layouts.
Steps
- Select Insert ? Table ? Draw Table.
- Hold the left mouse button and draw the outer border.
- Draw rows and columns freely inside it.
- Add or remove lines as needed.
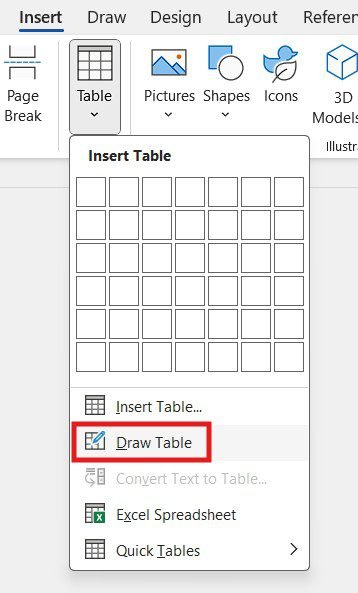
? It may look uneven at first — the next section evens it out in two clicks.
Which Method Should You Use?
| Method | Best for | Control |
|---|---|---|
| Grid selector | Quick, small tables | Low |
| Insert Table dialog | Reports and forms | High |
| Draw Table | Custom, irregular layouts | Highest |
How to Distribute Rows and Columns Evenly
- Click the table handle (the move icon) at the top-left.
- Go to the Layout tab under Table Tools.
- Click Distribute Rows, then Distribute Columns.
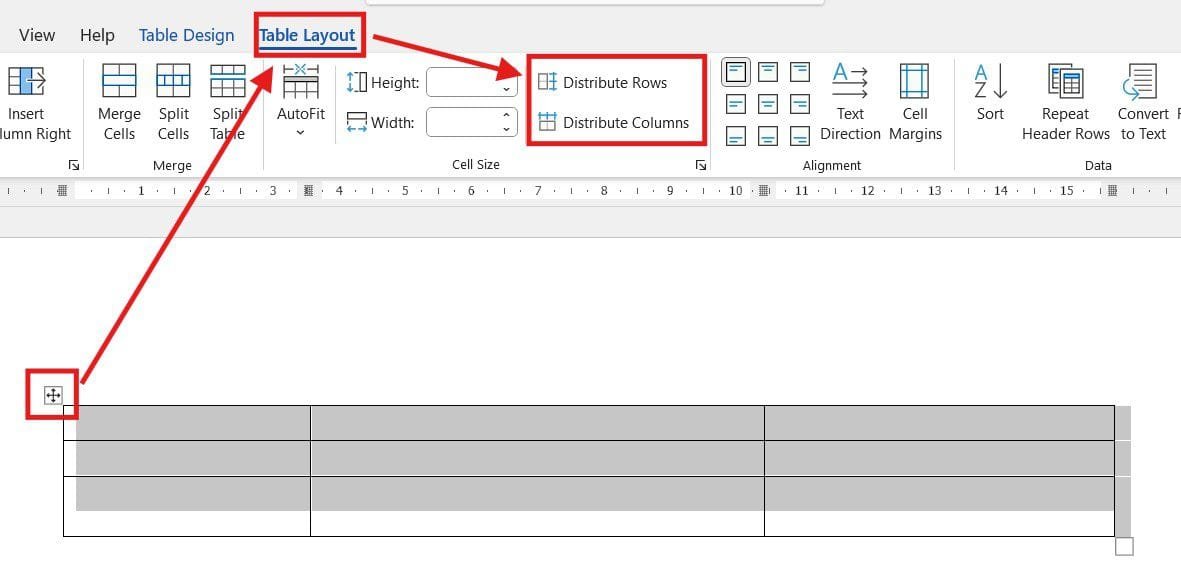
? The table snaps to even spacing instantly.
How to Add Rows and Columns After Creating a Table
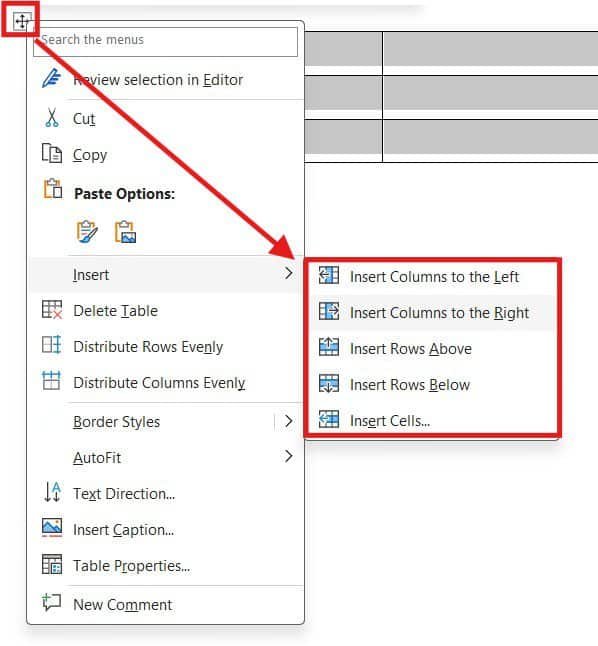
Right-click menu
Right-click inside the table to insert columns left or right, or rows above or below.
Layout ribbon
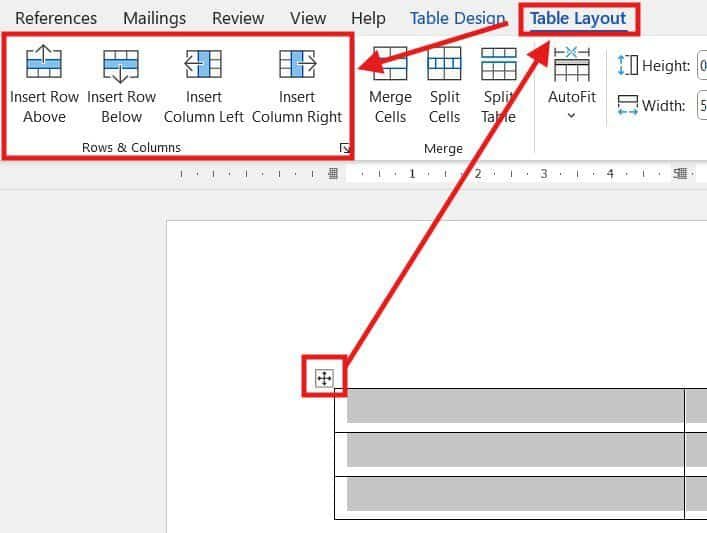
- Select the table.
- Go to the Layout tab.
- Use the Rows & Columns group to insert above, below, left, or right.
You can also hover between two rows or columns and click the plus (+) icon.

Editing a Table with the Draw Tool
Return to Draw Table any time to add rows or columns, adjust cell boundaries, or redesign the structure.
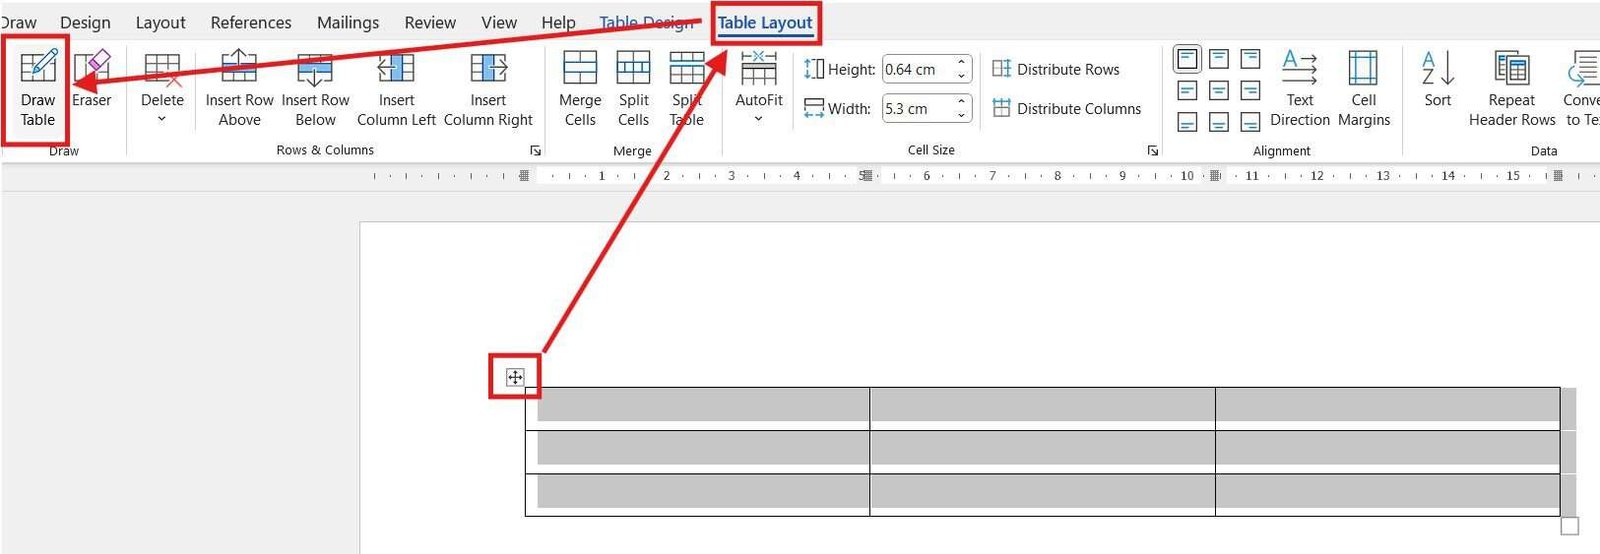
? After redrawing, run Distribute Rows and Columns again for balance.
Common Problems When Inserting a Table in Word
The table runs off the page
Too many columns for the width. Use AutoFit to Window, or adjust the margins in Word to give the layout more room.
Columns are uneven
Select the table, open the Layout tab, and click Distribute Columns to make them equal.
The table won’t resize the way you want
AutoFit is overriding manual widths. Set it to Fixed Column Width first, then drag the borders.
Text looks cramped in the cells
Add cell padding via Layout ? Cell Margins, and make sure the text is set correctly — see how to align text in Word inside the cells.
Pro Tips for Cleaner Tables
- Keep tables simple — fewer columns read better than a wall of data.
- Use consistent column widths and even spacing for a professional look.
- Press Tab to move to the next cell, and Tab in the last cell to add a new row instantly.
- Applying a header row? Combine it with a matching Microsoft Word keyboard shortcuts cheat sheet to speed up the whole document.
FAQs
How do I insert a table in Word?
To insert a table in Word, go to Insert ? Table, then drag across the grid, or use Insert Table to type exact rows and columns.
What is the easiest way to insert a table in Word?
The grid selector is the fastest — hover over the squares and click your chosen size.
Can I resize a table after inserting it?
Yes. Drag the borders, or use an AutoFit option under the Layout tab.
How do I space table rows evenly?
Select the table and click Layout ? Distribute Rows (and Distribute Columns).
Can I add rows or columns later?
Yes. Right-click inside the table, use the Layout ribbon, or click the plus (+) icon between rows or columns.
What is AutoFit in Word tables?
AutoFit adjusts column widths automatically to the content or the page width, depending on the option you pick.
Is drawing a table better than inserting one?
Only when you need an irregular or custom layout. For standard tables, the grid or dialog is quicker.
Conclusion
You can now insert a table in Word three ways — the grid selector for speed, the Insert Table dialog for control, and Draw Table for custom layouts — then distribute, resize, and expand it with ease.
With the structure in place, finish the layout properly by learning how to merge cells in a Word table for headers and grouped data.
Related Tutorials

Recent Microsoft Word Tutorials

Looking for more help with Microsoft Word? Browse all step-by-step Word tutorials covering formatting, layout, pages, and document setup.
? View all Microsoft Word tutorials: https://wordmadeeasy.halmanweb.com/microsoft-word/
? Need more support – check out the official guidance: https://support.microsoft.com/en-au

Prefer watching instead of reading? Many Word tutorials are also available as short, step-by-step videos on the Word Made Easy YouTube channel.