If you want to learn how to add lines in Word, this guide covers the 2 easiest methods. Knowing how to add lines in Word lets you separate sections, create writing or signature spaces, and give your document a cleaner, more structured look. You’ll learn how to add lines in Word using a table for structured layouts and the dash shortcut for quick dividers.
Whether you’re creating a worksheet, form, meeting notes, or assignment, knowing how to add lines in Word properly saves time and frustration. Word doesn’t always make this feature obvious, but the methods below are simple and reliable.
Watch the Video Tutorial
If you prefer to see this in action, the full video walkthrough is below, showing each method step by step.
Why Add Lines in Word Documents
Before you learn how to add lines in Word, it helps to understand what they’re used for. Horizontal lines serve practical purposes such as:
- Separating sections in long documents — especially useful alongside columns in Word
- Creating writing or signature spaces in forms
- Organising notes or worksheets
- Improving document flow and readability
- Making documents look more professional without complex design
Many users try to draw lines manually or insert shapes, which often leads to alignment issues. The two methods below show how to add lines in Word that stay clean and easy to manage.
Method 1: How to Add Lines in Word Using a Table
This method is perfect when you need multiple horizontal lines that stay evenly spaced — such as for forms, worksheets, or signature pages.
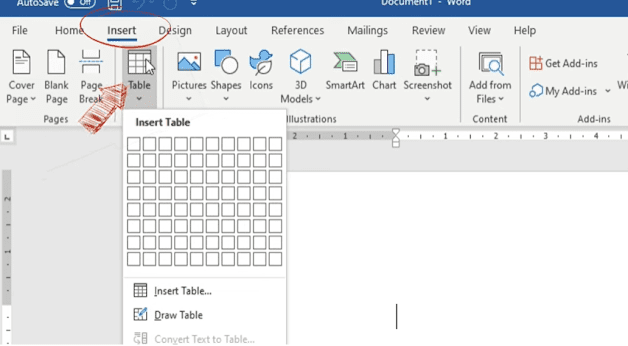
Step 1: Insert a Table
- Open your Microsoft Word document.
- Click on the Insert tab.
- Select Table.
- Choose a table size of 1 column by 8 rows. You can increase or reduce rows later.
The table will appear with visible borders, creating horizontal lines across the page.
Step 2: Remove the Outside Borders
To make the lines look clean:
- Click the small square at the top-left corner of the table to select it fully.
- Go to the Borders option in the toolbar.
- Click the dropdown arrow.
- Choose No Border or remove the outside borders only.
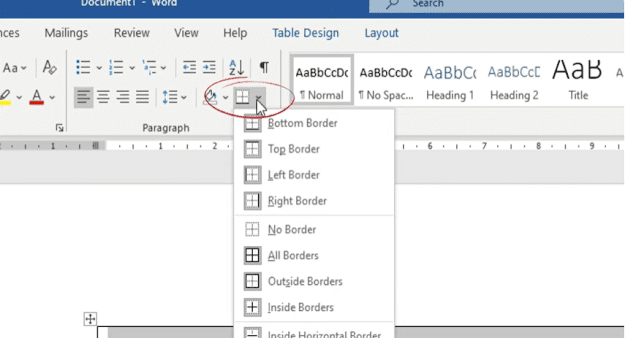
You may notice faint dotted lines on the screen. These are layout indicators that help with editing. They will not appear when the document is printed.
To confirm:
- Press Ctrl + P to open Print Preview.
- You’ll see the dotted lines disappear in the printed view.
Step 3: Add or Remove Lines
If you need to add more horizontal lines in Word:
- Click inside the last row.
- Press Enter.
- Each new row creates another horizontal line.
You can repeat this as many times as needed.
When to Use This Method to Add Lines in Word
- Creating forms or questionnaires
- Making worksheets for students
- Leaving space for handwritten answers
- Keeping lines evenly spaced and aligned
Method 2: How to Add Lines in Word Using the Dash Shortcut
This is the fastest way to add a horizontal line in Word and works well when you only need a few quick dividers.
Step 1: Type Three Dashes
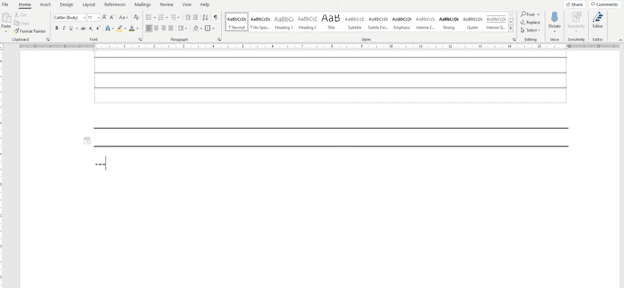
- Place your cursor where you want to add the line.
- Type three dashes: —
- Press Enter.
Word automatically converts the dashes into a full horizontal line across the page.
Step 2: Repeat to Insert More Lines
To insert more horizontal lines in Word:
- Type three dashes again
- Press Enter
This shortcut is especially useful for quickly separating sections in a document.
When to Use the Dash Shortcut to Add Lines in Word
- Adding section breaks in reports
- Separating headings and content
- Creating quick visual dividers
Adjusting Spacing Between Lines in Word
After you add lines in Word, spacing often becomes the next concern. Word gives you several ways to control this.
Adjust Line Spacing
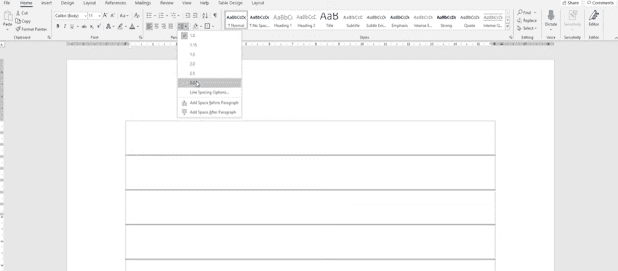
- Highlight the area with the lines.
- Click on Line and Paragraph Spacing.
- Choose a spacing value.
Higher numbers increase space between lines. Lower numbers reduce it.
Adjust Paragraph Spacing
For more precise control:
- Increase Space After Paragraph to add room between lines.
- Be careful with Space Before Paragraph, as it can spread lines too far apart.
Using paragraph spacing often gives better results than line spacing alone.
Common Mistakes to Avoid
Avoid these common mistakes when learning how to add lines in Word:
- Using shapes or drawing tools — these can shift when you edit text
- Manually typing underscores — they rarely align properly
- Ignoring print preview — what you see on screen isn’t always what prints
FAQs
How do I add lines in Word quickly?
The fastest way to add lines in Word is to type three dashes (—) and press Enter. Word automatically converts them into a horizontal line.
How do I insert a horizontal line in Word?
To insert a horizontal line in Word, place your cursor on a new line, type three dashes (—), and press Enter. For multiple evenly spaced lines, use a borderless table instead.
How do I add a horizontal line in Word for a form?
For forms, use a 1-column table with multiple rows, then remove the outside borders. This keeps the lines evenly spaced and prevents alignment issues when filling in the form.
Why doesn’t the dash shortcut work sometimes?
Make sure you type exactly three dashes and press Enter on a new line. If you’re inside a table or special formatting area, the shortcut may not trigger.
Why do I see dotted lines instead of solid lines?
Dotted lines are Word’s layout guides. They show where borders would be but do not appear when printed. Press Ctrl + P to confirm in Print Preview.
Can I change the thickness of horizontal lines in Word?
The dash method creates a standard line. To control thickness, use the Borders menu and select a thicker line style, or use shapes if you need full visual control.
Which method is better for forms?
The table method is better for forms because it keeps spacing consistent and lets you easily add or remove lines without affecting the layout.
Conclusion
Now that you know how to add lines in Word two different ways — using a borderless table for structured layouts or the dash shortcut for quick dividers — you can pick whichever method suits the document you’re working on.
For forms and worksheets, the table method gives you full control. For quick section breaks, the dash shortcut is the fastest. With proper spacing adjustments, you can fine-tune the layout — and if you notice any strange symbols appearing as you work, you can quickly remove formatting marks in Word to keep your view clean.
Related Tutorials
- How to Add Columns in Microsoft Word
- How to Remove Formatting Marks in Word
- How to Adjust Margins in Word

Recent Microsoft Word Tutorials

Looking for more help with Microsoft Word? Browse all step-by-step Word tutorials covering formatting, layout, pages, and document setup.
? View all Microsoft Word tutorials: https://wordmadeeasy.halmanweb.com/microsoft-word/
? Need more support – check out the official guidance: https://support.microsoft.com/en-au

Prefer watching instead of reading? Many Word tutorials are also available as short, step-by-step videos on the Word Made Easy YouTube channel.