Learning how to create automatic chapters in Word gives long documents a reliable structure. Each chapter can begin on a new page, appear in the Navigation Pane, and feed into a clickable table of contents in Word.
In this guide, you’ll learn three methods for formatting chapter headings, starting chapters on new pages, adding new chapters, and keeping your navigation tools accurate.
What Are Automatic Chapters in Word?
Automatic chapters use Word’s built-in heading styles to control document structure. When you apply Heading 1 to a chapter title, Word can move it to the top of a new page, display it in the Navigation Pane, and include it in an automatic table of contents.
This structure works particularly well for:
- Books and eBooks containing several chapters
- Reports, dissertations, and academic assignments
- Training manuals and business documents
- Long files that combine headings, sections, and automatic page numbers in Word
The key to how to create automatic chapters in Word is consistency. Instead of formatting every title and inserting page breaks manually, you modify one style and reuse it throughout the document.
Watch the Video Tutorial
If you prefer to see this in action, the full video walkthrough is below, showing each method step by step.
How to Create Automatic Chapters in Word: Step-by-Step
The complete process has three parts. First, customise Heading 1. Next, apply the style whenever a chapter begins. Finally, use the Navigation Pane and update the table of contents as your document grows.
Method 1: How to Create Automatic Chapters in Word with Heading 1
The first part of how to create automatic chapters in Word is configuring Heading 1. Modifying this built-in style lets you control every main chapter title from one central setting.
Apply Heading 1 to a Chapter Title
- Select an existing chapter title.
- Open the Home tab.
- Find the Styles group.
- Select Heading 1.
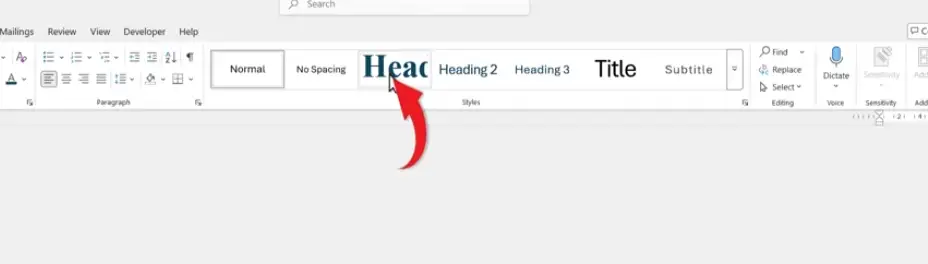
? The chapter title becomes part of the document hierarchy and appears in Word’s navigation tools.
Modify the Heading 1 Style
Next, change the style’s appearance. Every chapter title using Heading 1 will inherit these settings.
- Open the Home tab.
- Right-click Heading 1 in the Styles group.
- Select Modify.
- Choose the font and size you want for chapter titles.
- Select Bold and Centre for a traditional book-style heading.
- Choose a font colour if required.

? Every chapter using Heading 1 now follows the updated font, size, alignment, and colour settings.
Make Each Chapter Start on a New Page
This setting makes the chapter system automatic. Word adds a new-page instruction to Heading 1, so you no longer need to insert a separate page break before every chapter.
- In the Modify Style window, select Format.
- Select Paragraph.
- Open the Line and Page Breaks tab.
- Select Page break before.
- Select OK.
- Select OK again to save the modified style.
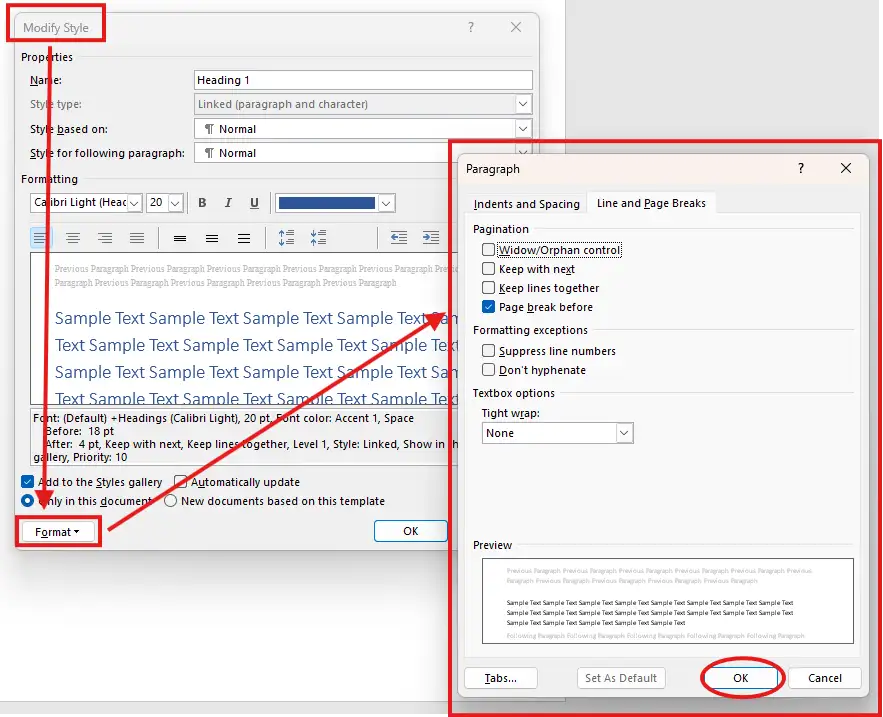
? Done. Every Heading 1 chapter now starts at the top of a new page. No manual page break required.
Method 2: How to Create Automatic Chapters in Word as You Write
Once Heading 1 is configured, how to create automatic chapters in Word becomes a repeatable one-click process. You do not need to press Enter repeatedly, centre the title manually, or recreate its formatting.
Start a New Chapter Instantly
- Place the cursor where the new chapter should begin.
- Open the Home tab.
- Select Heading 1 in the Styles group.
- Type the chapter title, such as Chapter 4.
- Press Enter and begin writing the chapter text.
? Word starts a new page, applies the chapter formatting, and adds the title to the document structure. That’s it.
Repeat these steps whenever another chapter is needed. If your content is stored across several files, combine it first using the guide on how to merge documents in Word.
Return to Normal Body Text
After typing the chapter title, press Enter. Word will usually return to the following paragraph style automatically. If the next paragraph still uses the chapter format, select Normal from the Styles group before typing the body text.
? Your chapter title keeps its structure while the following paragraph returns to standard body formatting.
The final part of how to create automatic chapters in Word is keeping the document easy to navigate. Heading 1 powers both the Navigation Pane and the automatic table of contents.
Open the Navigation Pane
- Open the View tab.
- Select Navigation Pane in the Show group.
- Select Headings in the pane if another view is active.
- Select a chapter title to jump directly to that part of the document.
? The Navigation Pane updates as you add headings and gives you a clickable overview of every chapter.
Update the Table of Contents
The Navigation Pane updates immediately, but the table of contents must be refreshed after you add, remove, or rename chapters.
- Select the table of contents.
- Select Update Table.
- Choose Update entire table.
- Select OK.

? New chapter titles and their page numbers now appear in the table of contents.
Follow a Table of Contents Link
Hold Ctrl and select a chapter entry in the table of contents to jump to it. You can also select the same chapter in the Navigation Pane without holding another key.
? Long documents become faster to browse. You can move between chapters without scrolling through every page.
Which Method Should You Use?
| Method | Best For |
|---|---|
| Modify Heading 1 | Setting up automatic chapters for the first time |
| Apply Heading 1 | Starting each chapter while writing or editing |
| Use navigation tools | Moving through long files and keeping chapter listings accurate |
All three methods form one workflow for how to create automatic chapters in Word. Configure the style once, apply it to every chapter, and update the table of contents before sharing or printing the document.
Common Problems with Automatic Chapters
Most problems with how to create automatic chapters in Word come from an incorrect heading style or an outdated table of contents. Check these four settings before changing the wider document layout.
The Chapter Does Not Start on a New Page
Right-click Heading 1, select Modify, and open Format ? Paragraph ? Line and Page Breaks. Confirm that Page break before is selected.
The Chapter Is Missing from the Navigation Pane
Select the chapter title and apply Heading 1. Enlarging, centring, or bolding ordinary text does not assign a heading level, so Word will not recognise it as a chapter.
The Table of Contents Does Not Show New Chapters
Select the table, choose Update Table, and select Update entire table. Updating page numbers only will not add a new chapter title.
Ordinary Text Uses the Chapter Format
Place the cursor in the affected paragraph and apply the Normal style. Reserve Heading 1 for main chapter titles, then use Heading 2 and Heading 3 for subsections.
Pro Tips for Automatic Chapters in Word
After learning how to create automatic chapters in Word, use these techniques to keep the document reliable as it grows.
- Use Heading 1 for chapters, Heading 2 for major sections, and Heading 3 for subsections.
- Keep chapter names consistent, such as Chapter 1, Chapter 2, and Chapter 3.
- Use Page break before when every chapter shares the same headers, footers, margins, and numbering format.
- Use section breaks when a chapter needs different formatting — for a complete walkthrough, see how to use different page numbers in Word.
- Update the entire table of contents before exporting, printing, or submitting the document.
- Use the Navigation Pane to check the heading hierarchy before finalising a long file.
FAQs
How do I create automatic chapters in Word?
To learn how to create automatic chapters in Word, modify Heading 1 and enable Page break before. Apply the style to each chapter title, then update the entire table of contents.
Can Word number chapters automatically?
Yes. Connect a multilevel list to Heading 1 so the chapter numbers update when you add, remove, or rearrange chapters.
Why are my chapters missing from the Navigation Pane?
The Navigation Pane recognises built-in heading styles. Apply Heading 1 to each chapter title instead of relying on manual font formatting.
Does the table of contents update automatically?
No. Select the table of contents, choose Update Table, and select Update entire table after changing your chapters.
What is the difference between Heading 1 and Heading 2?
Heading 1 identifies main chapters. Heading 2 identifies sections within those chapters, creating a clear document hierarchy.
Should I use page breaks or section breaks for chapters?
Use Page break before when chapters share one layout. Use a section break when a chapter needs different headers, footers, margins, orientation, or numbering.
Can I jump between chapters without a table of contents?
Yes. Open the Navigation Pane from the View tab and select any chapter heading to jump directly to it.
Can I create an index for chapter topics?
Yes. An index lists selected terms and page numbers instead of document headings. See how to create an index in Word for the complete process.
Conclusion
Knowing how to create automatic chapters in Word removes repetitive formatting from long documents. One Heading 1 change controls the chapter design, new-page behaviour, and navigation structure.
Configure the style once, apply it whenever a chapter begins, and update the entire table of contents before publishing. Your document becomes faster to edit and easier to navigate.
For an even faster editing workflow, keep the Word keyboard shortcuts cheat sheet beside you while organising the document.
Related Tutorials
- How to Create a Table of Contents in Word
- How to Use Different Page Numbers in Word
- How to Rearrange Pages in Word

Recent Microsoft Word Tutorials

Looking for more help with Microsoft Word? Browse all step-by-step Word tutorials covering formatting, layout, pages, and document setup.
? View all Microsoft Word tutorials: https://wordmadeeasy.halmanweb.com/microsoft-word/
? Need more support – check out the official guidance: https://support.microsoft.com/en-au

Prefer watching instead of reading? Many Word tutorials are also available as short, step-by-step videos on the Word Made Easy YouTube channel.