If you want to know how to create an index in Word, you only need to mark a few entries, insert the index field, and let Word generate the rest automatically. This is exactly the same logic behind a table of contents in Word, just keyword-driven instead of heading-driven. It’s the cleanest way to make a long document genuinely searchable.
In this guide, you’ll learn how to mark index entries, insert and format the index, update it after edits, build subentries, and fix the most common indexing problems.
What Is an Index in Word?
An index is an alphabetised list of keywords and the page numbers where each one appears, usually placed at the very end of a long document. It’s the reader’s shortcut — instead of skimming chapters or running Ctrl+F, they jump straight to the topic they need.
Use one when your document is:
- A book, eBook, or manual readers will reference repeatedly
- A technical guide where specific terms matter more than chapter titles
- An academic paper, dissertation, or long report
- Training material where readers need to find concepts fast
Unlike a table of contents in Word, which is generated automatically from your heading styles, an index is built manually — you tell Word which words to track, and it does the page-number bookkeeping for you.
Watch the Video Tutorial
If you prefer to see this in action, the full video walkthrough is below, showing each method step by step.
How to Create an Index in Word: Step-by-Step
There are three core stages — mark the entries you want, insert the index, then keep it updated as the document grows. Follow them in order and Word handles the page numbering automatically.
Method 1: How to Create an Index in Word by Marking Entries
Word can’t guess which words you want indexed. Every entry has to be flagged first so it knows what to track.
Steps to Mark an Entry
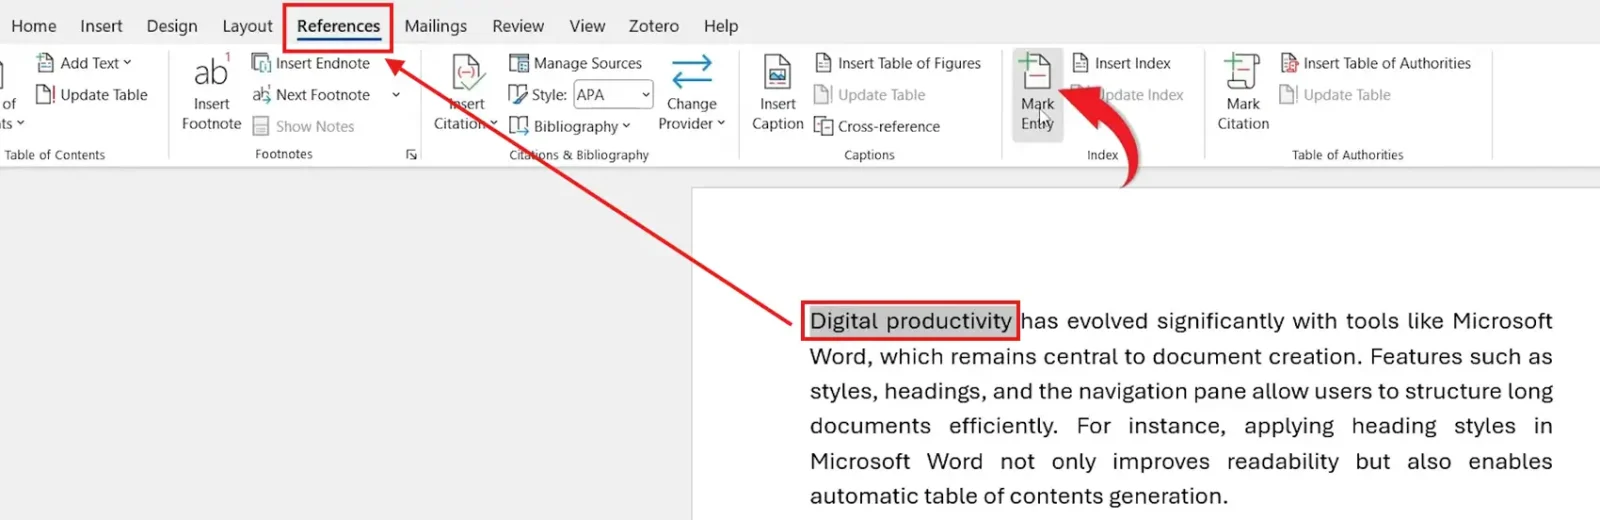
- Highlight the word or phrase you want to index.
- Go to the References tab.
- Click Mark Entry, or press Alt + Shift + X.
- In the Mark Index Entry dialog, confirm the term appears under Main Entry.
- Click Mark to index that one instance, or Mark All to index every occurrence in the document.
- Click Close when you’re done.
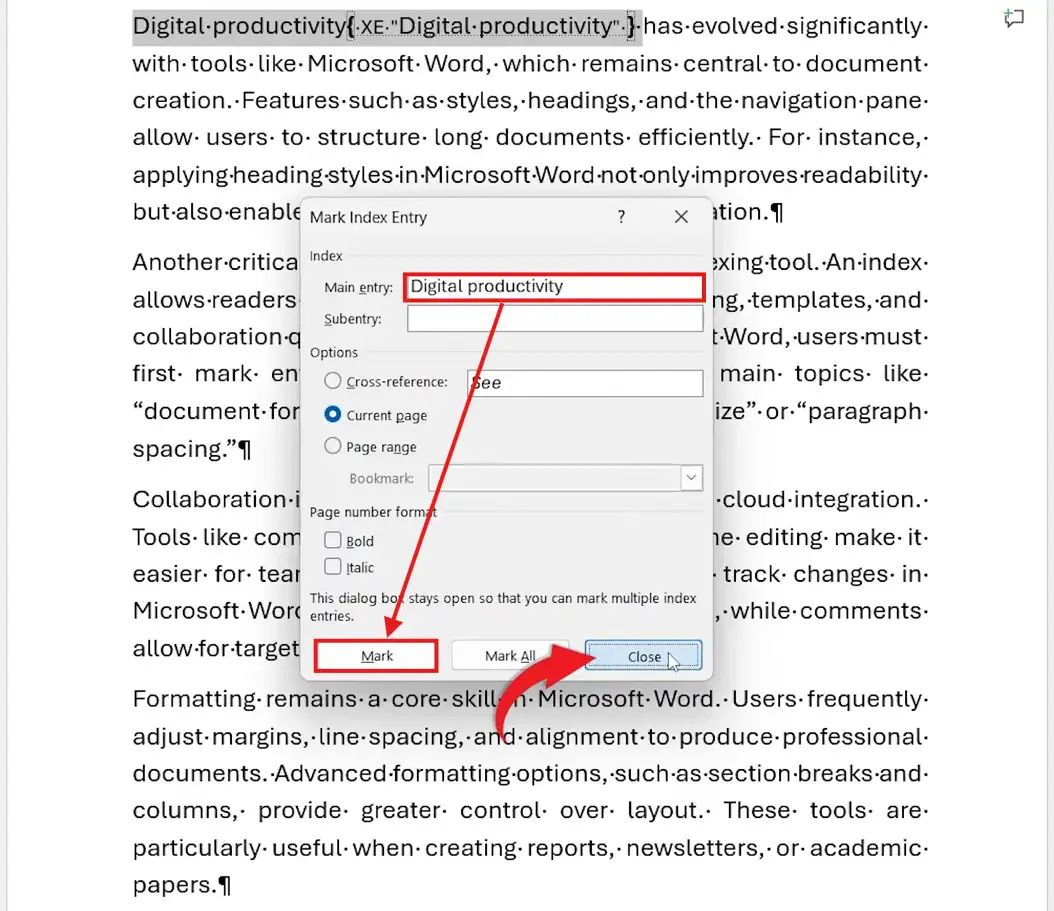
? Word inserts a hidden field code that looks like { XE “your term” } next to the word. That’s the marker the index pulls from later — it doesn’t print and it doesn’t affect your layout.
Why You See XE Codes After Marking Entries
The moment you mark your first entry, Word switches formatting marks on automatically. That’s where the XE codes come from — they’re not damage, they’re the index doing its job.
- XE codes mark every word you’ve indexed
- They never appear in the printed or exported document
- They make it easy to spot what’s already been indexed at a glance
To toggle them off (or back on) any time:
- Go to the Home tab.
- Click the Show/Hide (¶) button — or press Ctrl + Shift + 8.
? Keep them visible while indexing — it’s far easier to spot duplicates and missed terms when you can see what’s already tagged. If they’re getting in your way for unrelated reasons, see the full guide on how to remove formatting marks in Word.
Method 2: How to Create an Index in Word by Inserting the Index Field
Once your entries are marked, you can build the index itself. This is where Word turns all those hidden XE codes into a clean, alphabetised list.
Steps to Insert an Index
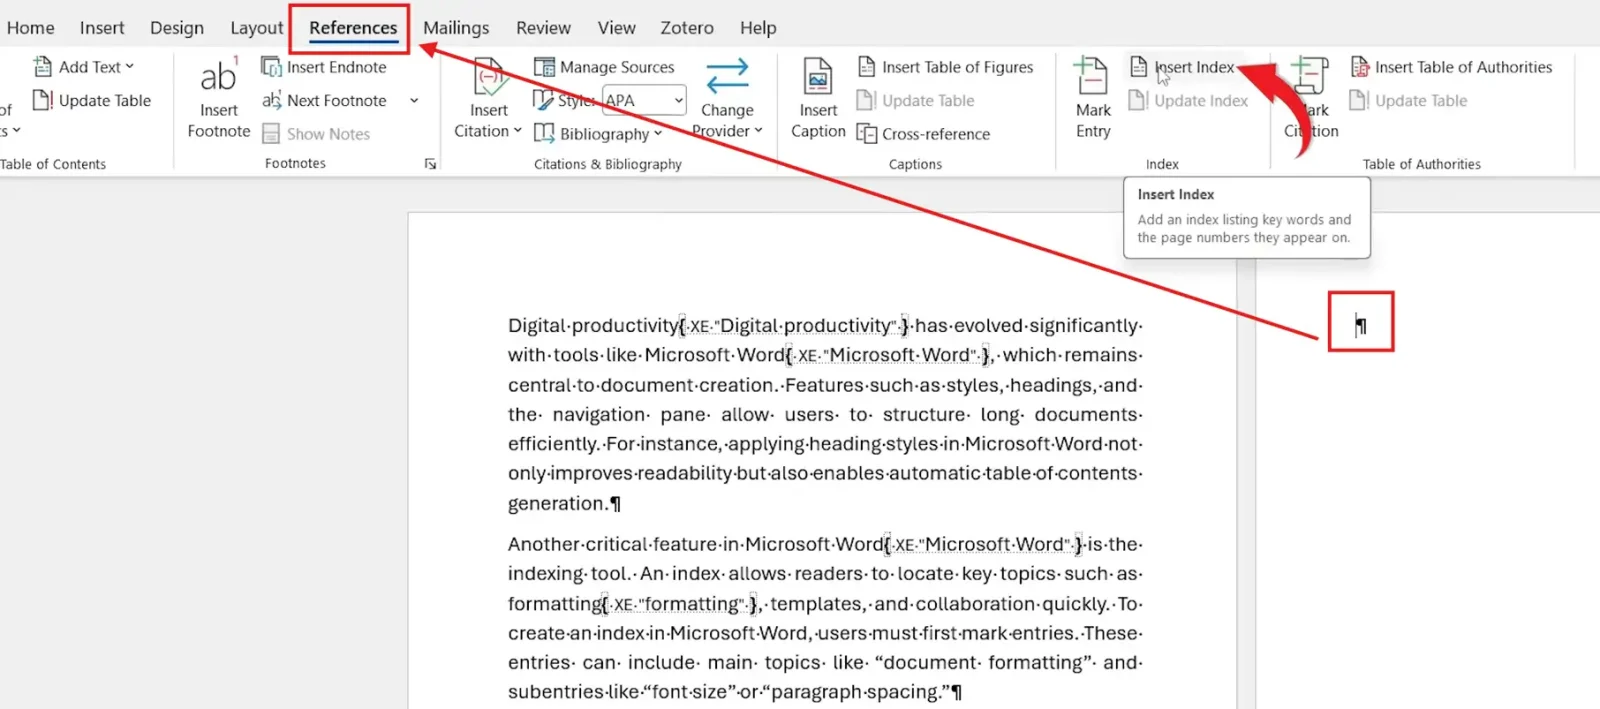
- Place your cursor where the index should appear — usually a new page at the very end of the document.
- Go to the References tab.
- Click Insert Index.
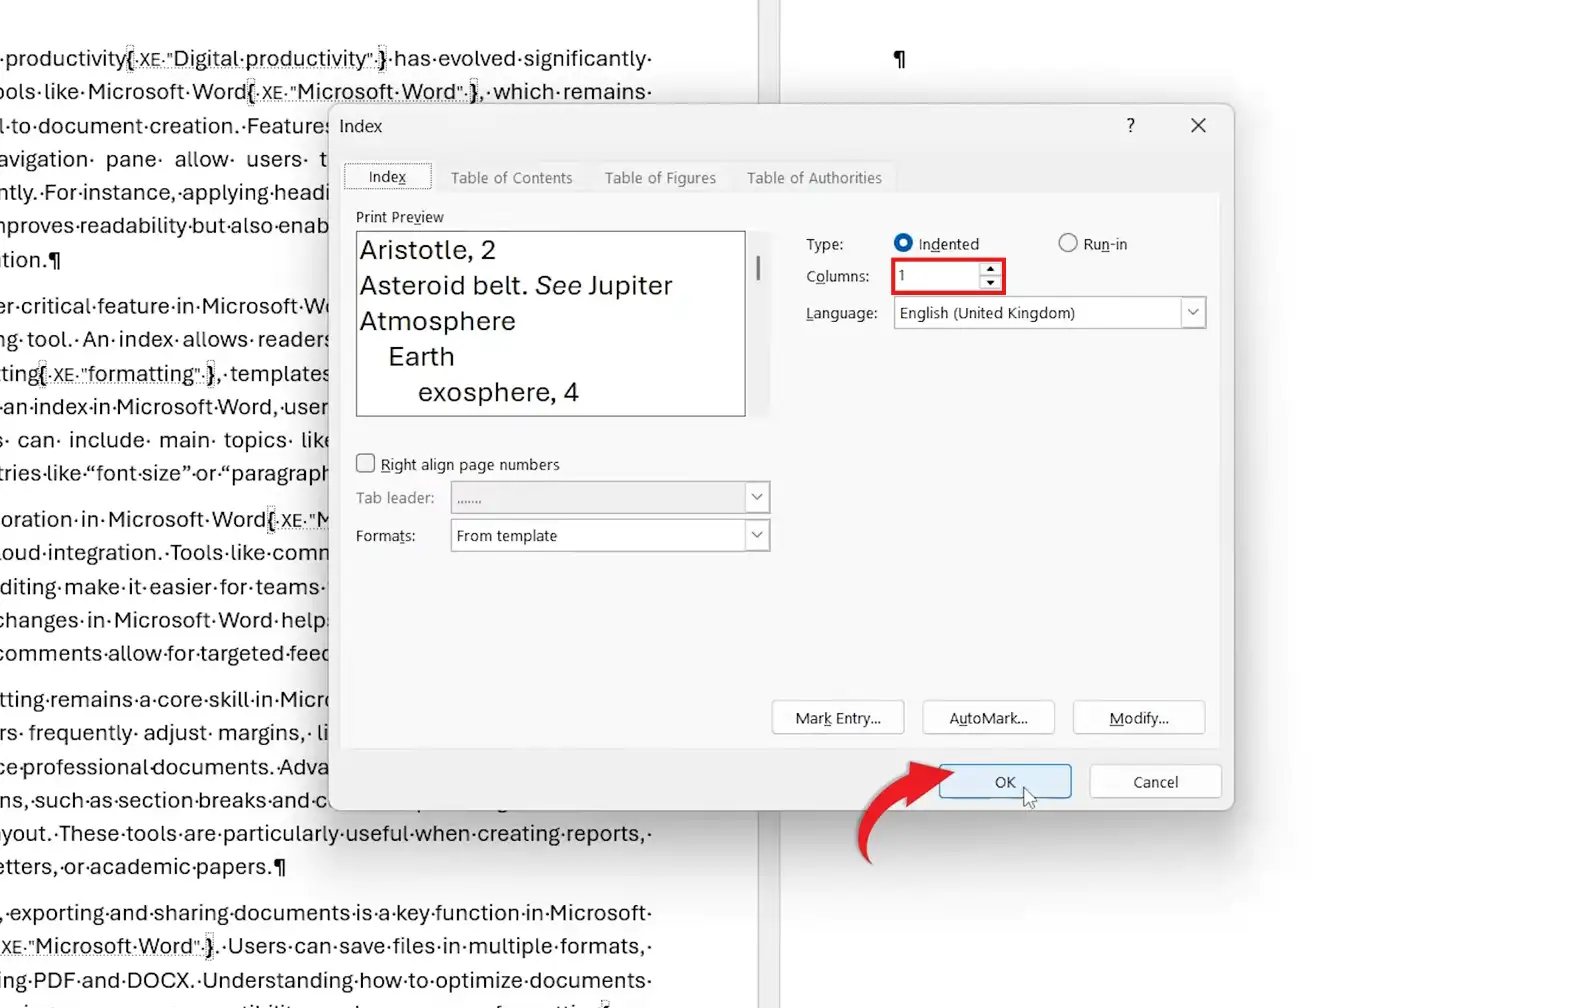
- Choose your formatting options — number of columns, style (Indented or Run-in), and whether page numbers align right.
- Use the Print Preview panel to check how it will look.
- Click OK.
? Word builds the index instantly — alphabetised, with every marked term and its page number. Two columns reads better in books and manuals; one column works fine for short reports.
Method 3: How to Create an Index in Word That Updates Automatically
The index doesn’t refresh itself. If you add entries, delete a paragraph, or your pagination shifts — and it will, especially if you’ve inserted page numbers in Word — you need to tell Word to rebuild it.
Steps to Update the Index
- Click anywhere inside the index to select it.
- Right-click and choose Update Field, or press F9.
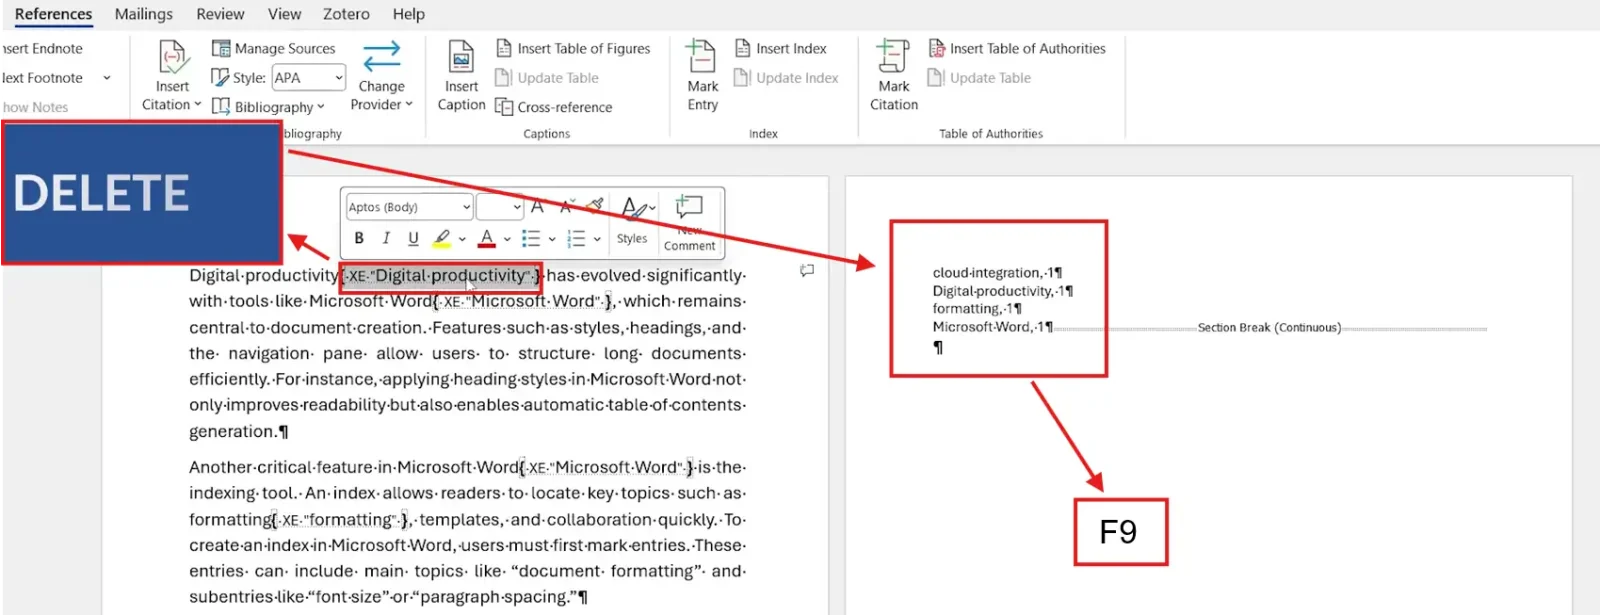
? To add a new entry later, highlight the term, press Alt + Shift + X, click Mark All, then hit F9 to pull it into the index. To remove an entry, find its { XE “…” } code, select the whole code including the braces, press Delete, and update with F9.
Which Method Should You Use?
| Method | Best For | Speed |
|---|---|---|
| Mark Entries | Selecting which keywords appear in the index | Slowest — manual |
| Insert Index Field | Generating the alphabetised list of terms | Instant |
| Update with F9 | Refreshing page numbers after edits | Instant |
? All three are part of the same workflow — mark, insert, update. Skip any one of them and the index won’t reflect what’s actually in the document.
Create Subentries in an Index
Subentries group related terms under a single parent — useful when you’ve got a topic with multiple facets. For example, a main entry of Formatting with subentries for Font Size, Line Spacing, and Margins.
- Highlight the related phrase in your document.
- Press Alt + Shift + X to open the Mark Index Entry dialog.
- Type the parent topic into the Main Entry field.
- Type the child term into the Subentry field.
- Click Mark, then close the dialog.
- Press F9 inside the index to refresh.
? The index now shows the parent term in bold with the subentries listed and indented underneath — much easier to scan than a flat alphabetical list.
Common Problems When Creating an Index in Word
Entries Not Appearing in the Index
The entry was never marked, or the index wasn’t refreshed after marking. Check the term has a visible { XE “…” } code next to it, click inside the index, and press F9.
Strange Codes Showing Throughout the Document
Those are XE field codes — completely normal. They’re visible because formatting marks are on. Press Ctrl + Shift + 8 to hide them. They won’t print or export either way.
Page Numbers Are Out of Date
The index doesn’t auto-refresh. Click inside it and press F9 after any edit that changes pagination — adding sections, inserting images, changing margins.
An Entry Won’t Go Away
You’ve deleted the visible word but the XE code is still there. With formatting marks on, find the { XE “…” } code, select it including both braces, press Delete, then update the index with F9.
Pro Tips for a Cleaner Index
- Build the index after the document is finished — marking entries while you’re still writing means re-running F9 every time pagination shifts.
- Be ruthless about what you index. Over-indexed documents read like a glossary and lose their usefulness.
- Use consistent terminology — “formatting” and “formatting tools” will appear as two separate entries even though they’re the same idea.
- For long technical documents, pair the index with structured navigation — see the guide on how to create automatic chapters in Microsoft Word so readers can move through the document by section and look things up by keyword.
- Keep formatting marks visible while indexing, then toggle them off before final export.
FAQs
How do I create an index in Word?
To create an index in Word, highlight each term you want to include, press Alt + Shift + X to mark it, then go to References ? Insert Index to generate the list. Press F9 inside the index any time you need to refresh it.
What’s the difference between an index and a table of contents?
A table of contents lists headings in the order they appear and is generated from heading styles. An index lists keywords alphabetically and is built from terms you mark manually. Most long documents use both.
Do XE index entries print in Word?
No. XE field codes are hidden text — they’re visible only when formatting marks are turned on. They never appear in printed copies, PDFs, or exported documents.
Can I add subentries to an index in Word?
Yes. In the Mark Index Entry dialog, put the parent term in the Main Entry field and the child term in the Subentry field. The index will list subentries indented under their parent.
How do I update an index in Word after editing?
Click anywhere inside the index, then press F9. Word rebuilds the whole index with the current page numbers and any newly marked entries.
How do I remove an index entry in Word?
Turn on formatting marks with Ctrl + Shift + 8, find the { XE “term” } code next to the word, select the entire code including both braces, and press Delete. Update the index with F9.
When should I create an index?
Create it once the document is structurally finished. Marking entries before final edits means refreshing the index repeatedly as pagination shifts.
Conclusion
Learning to create an index in Word turns a long, hard-to-navigate document into something readers can actually use. The workflow is short — mark the terms that matter, drop in the index field, refresh with F9 whenever the document changes.
Get the index right and the rest of your document organisation falls into place — pair it with a proper table of contents in Word and your readers have both top-down navigation and keyword-level search built straight into the document.
Related Tutorials
- How to Create a Table of Contents in Word
- How to Insert Page Numbers in Word
- How to Remove Formatting Marks in Word

Recent Microsoft Word Tutorials

Looking for more help with Microsoft Word? Browse all step-by-step Word tutorials covering formatting, layout, pages, and document setup.
? View all Microsoft Word tutorials: https://wordmadeeasy.halmanweb.com/microsoft-word/
? Need more support – check out the official guidance: https://support.microsoft.com/en-au

Prefer watching instead of reading? Many Word tutorials are also available as short, step-by-step videos on the Word Made Easy YouTube channel.