Adding a header on the first page only in Word is one of the quickest formatting wins available — and it’s built right into the Header & Footer tools, no workarounds needed. Whether you need a header on the first page only for a cover sheet, business report, or university assignment, Word handles it with a single checkbox called Different First Page. If you’re already comfortable with removing headers and footers in Word, setting a header on the first page only in Word is the natural next step.
In this guide, you’ll learn two methods for adding a header on the first page only in Word, how to format it professionally, and how to fix the most common problems that trip people up.
What Is a Header on the First Page Only in Word?
A header on the first page only in Word appears exclusively on the opening page of your document while remaining hidden from every page that follows. Word controls this with the Different First Page setting, found inside the Header & Footer tab.
This setup is commonly used for:
- Cover pages and title pages
- Business reports and proposals
- School and university assignments
- Research papers and dissertations
- Project documentation and client presentations
Instead of repeating the same header across every page, a header on the first page only in Word keeps the rest of the document clean and uncluttered. If you need different headers across multiple sections rather than just the first page, the same principle extends to putting different footers on each page in Word.
Watch the Video Tutorial
If you prefer to see this in action, the full video walkthrough is below, showing each method step by step.
How to Add a Header on the First Page Only in Word: Step-by-Step
There are two ways to set a header on the first page only in Word. Both activate the same Different First Page setting and produce the same result — pick whichever suits your workflow.
Method 1: How to Add a Header on the First Page Only in Word Using Double-Click
This is the fastest route — no ribbon navigation required.
- Open the Word document where you want to add the header.
- Double-click near the top margin of the first page to open the header area.
- In the Header & Footer tab, go to the Options group.
- Tick the Different First Page checkbox.
- Click inside the header area and type your content — company name, report title, document number, or anything else you need.
- Click Close Header and Footer, or double-click anywhere in the document body to exit.
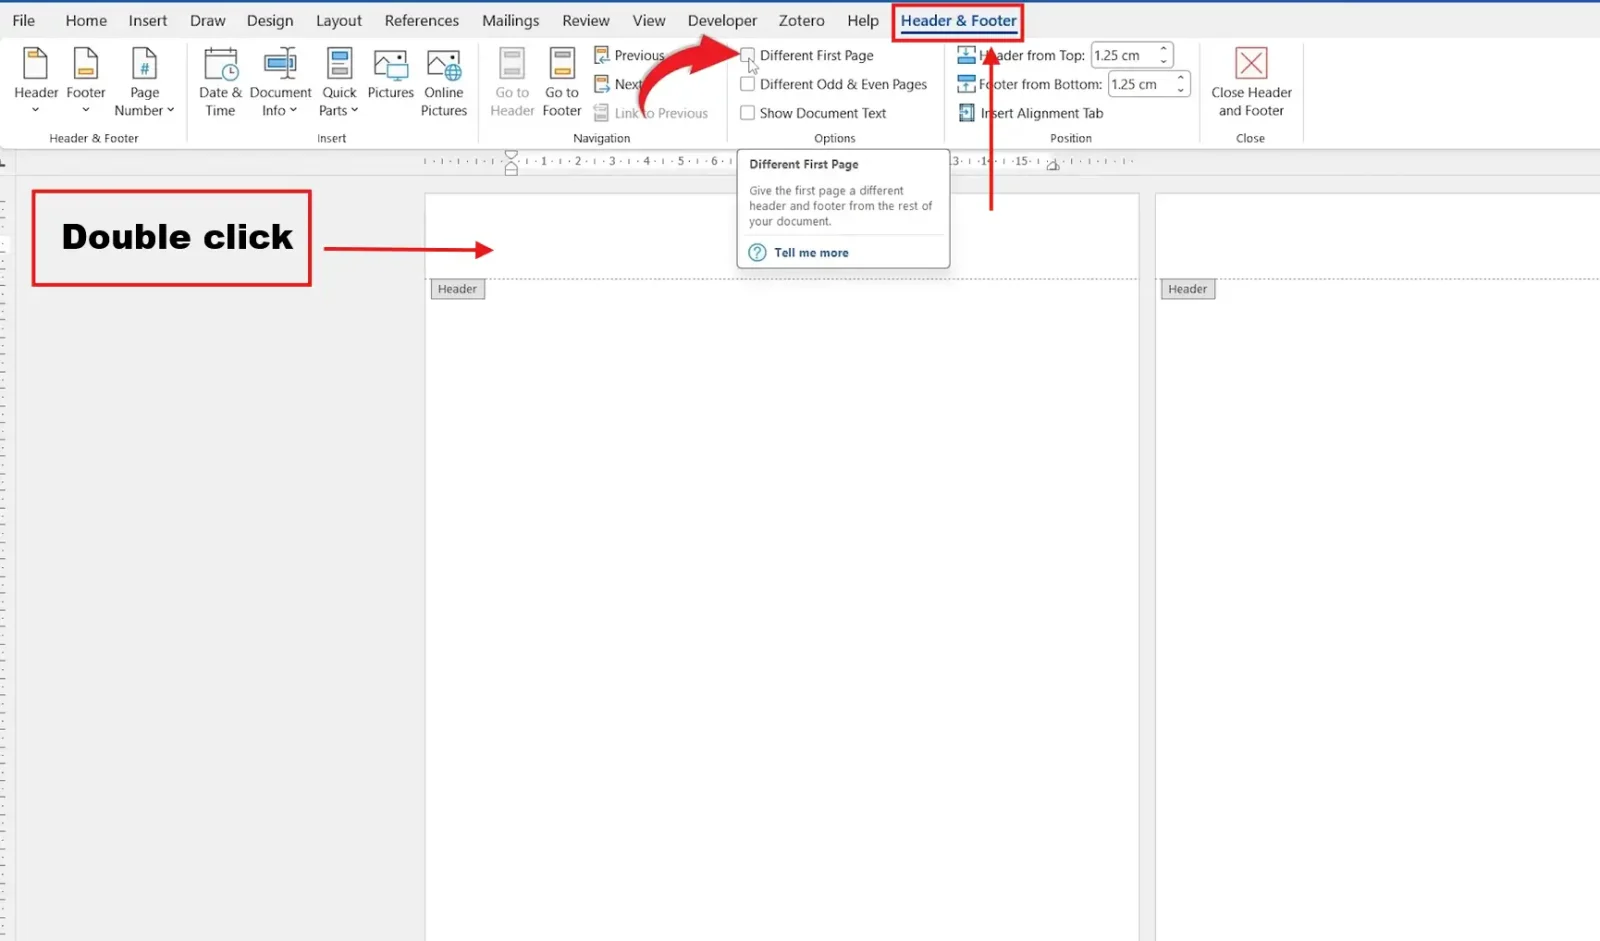
As soon as you tick Different First Page, Word isolates the header on the first page only and leaves every subsequent page clean. Scroll through the document to confirm the header only appears on page one.
Method 2: How to Add a Header on the First Page Only in Word via the Insert Tab
Use this method if you prefer to work from the ribbon rather than clicking in the margin.
- Open your document.
- Click the Insert tab in the ribbon.
- Click Header in the Header & Footer group.
- Select Edit Header from the dropdown.
- In the Header & Footer tab, locate the Options group and tick Different First Page.
- Type your header content on the first page.
- Click Close Header and Footer to return to the document.
Both methods produce the same result: a header on the first page only in Word, with every other page left clean. The only difference is how you enter the header editor.
Which Method Should You Use?
| Method | Best For | Speed |
|---|---|---|
| Method 1 — Double-click | Quick edits, experienced users | Fastest |
| Method 2 — Insert tab | Beginners, ribbon-based workflows | Slightly slower |
Formatting Your Header on the First Page Only
Once your header on the first page only in Word is in place, you can customise it using standard formatting tools — no specialist knowledge required.
Increase Font Size
Select your header text and increase the font size for better visibility. A size between 14–16pt typically works well for title headers — see the guide on how to change font size in Word for the full options.
Apply Bold Formatting
Bold text draws the eye to key information. Select the header text and press Ctrl + B to apply bold instantly.
Centre the Header
Press Ctrl + E to centre-align the header text for a balanced, symmetrical layout.
Add a Bottom Border
A bottom border visually separates the header from the document body. Go to Home ? Paragraph ? Borders ? Bottom Border — see our full guide on how to add a bottom border in Word for detailed steps.
Common Problems When Adding a Header on the First Page Only in Word
Header Is Appearing on Every Page
The Different First Page checkbox isn’t ticked. Double-click the header area, go to Header & Footer ? Options, and enable it. Without this, Word mirrors the same header across all pages rather than restricting it to a header on the first page only.
Header Has Disappeared from All Pages
You may have typed in the wrong header zone. When Different First Page is enabled, Word creates two separate areas: “First Page Header” and “Header” (for all other pages). Make sure you typed your content in the correct zone for the result you want.
Page Numbers Are Affected
Page numbers continue to function normally after enabling Different First Page. If they’re behaving unexpectedly, check whether they were inserted into the first-page header zone rather than the footer — move them to the footer if needed. For a full setup guide see how to insert page numbers in Word.
Header Content Isn’t Saving
If you close the document without saving, header changes are lost like any other edit. Always save with Ctrl + S after closing the header editor.
Pro Tips for a Header on the First Page Only in Word
- Keep header text concise. A company name or document title is enough — don’t cram in too much information.
- Add a logo. You can insert a company logo or image directly into the first-page header area via Insert ? Pictures.
- Use different headers on odd and even pages if you need page-specific headers on the rest of the document — this setting sits next to Different First Page in the Options group.
- Preview before sharing. Check File ? Print ? Print Preview to confirm the header on the first page only is exactly where you want it — see how to change page size in Word if the header margins don’t look right for your layout.
- Pair with footer page numbers for complete professional formatting — page numbers in the footer are unaffected by the Different First Page header setting.
FAQs
How do I add a header on the first page only in Word?
Double-click the top margin to open the header, tick Different First Page in the Header & Footer tab, type your content in the “First Page Header” zone, then close the editor. The header on the first page only in Word will appear on page one and nowhere else.
Can I have a different header on page one and another on the rest of the document?
Yes. After enabling Different First Page, Word creates two separate header zones. Type your first-page content in “First Page Header”, then click into the “Header” zone on page two to add a separate header for the remaining pages.
Will enabling Different First Page affect my page numbers?
No — page numbers continue working normally. If they appear in your footer, they’re not affected at all. If they were inserted into the header, move them to the footer to avoid layout issues.
How do I remove the header on the first page only in Word?
Open the header, select all content in the “First Page Header” zone, and delete it. Alternatively, uncheck Different First Page to revert to a standard header that repeats on every page.
Does this work in all versions of Word?
Yes — the Different First Page setting is available in Word 2016, 2019, 2021, and Microsoft 365. The steps are the same across all modern versions.
Can I add a logo or image to the header on the first page only in Word?
Yes. While inside the “First Page Header” zone, go to Insert ? Pictures and select your image. Resize it as needed — keep it small enough that it doesn’t push the document content too far down.
Why is my header showing on every page instead of just the first?
The Different First Page option isn’t enabled. Open the header editor, go to Header & Footer ? Options, and tick the checkbox. This single setting is what tells Word to restrict the header on the first page only in Word and hide it everywhere else.
Conclusion
Setting a header on the first page only in Word comes down to one checkbox — Different First Page — and two simple routes to get there. Whether you prefer double-clicking the top margin or navigating via the Insert tab, the result is the same: a polished header on the first page only, with a clean header-free document body on every page that follows.
Once the header on the first page only in Word is set up, consider removing it entirely later if your needs change — our guide on removing headers and footers in Word walks you through every option.
Related Tutorials
- How to Remove Headers and Footers in Word
- How to Remove Page Numbers in Word
- How to Insert Page Numbers in Word

Recent Microsoft Word Tutorials

Looking for more help with Microsoft Word? Browse all step-by-step Word tutorials covering formatting, layout, pages, and document setup.
? View all Microsoft Word tutorials: https://wordmadeeasy.halmanweb.com/microsoft-word/
? Need more support – check out the official guidance: https://support.microsoft.com/en-au

Prefer watching instead of reading? Many Word tutorials are also available as short, step-by-step videos on the Word Made Easy YouTube channel.