Knowing how to change the font in Word is one of the simplest ways to improve the appearance and readability of any document — and it works hand in hand with knowing how to change font size in Word for complete control over your text.
In newer versions of Microsoft Word the default font is usually Aptos. Some users like it, but many prefer a different typeface for a more professional or personalised look.
In this guide, you’ll learn how to switch fonts, preview styles before applying them, set a default font, and install new fonts in Word.
Why Change the Font in Word?
Different fonts create different styles and reading experiences. Changing fonts can help you:
- Improve readability
- Create professional documents
- Match branding or design styles
- Personalise resumes, letters, and reports
- Make headings and text stand out
Watch the Video Tutorial
If you prefer to see this in action, the full video walkthrough is below, showing each method step by step.
What Is the Default Font in Word?
In modern versions of Word the default font is usually Aptos. Older versions commonly used:
- Calibri
- Times New Roman
Many users change the default font to suit personal preference or document style requirements.
How to Change the Font in Word: Step-by-Step
There are three reliable ways to change the font, depending on whether you want a one-off change, a preview before committing, or a font that applies to every future document.
Method 1: How to Change the Font in Word Using the Font Dropdown
This is the quickest method and works for everyday font changes from the Home tab.
Steps:
- Select the text you want to change by clicking and dragging over it, or press Ctrl + A to select all text
- Go to the Home tab
- Locate the Font dropdown menu — it usually shows the current font name, such as Aptos
- Click the dropdown arrow, scroll through the list, and select a font
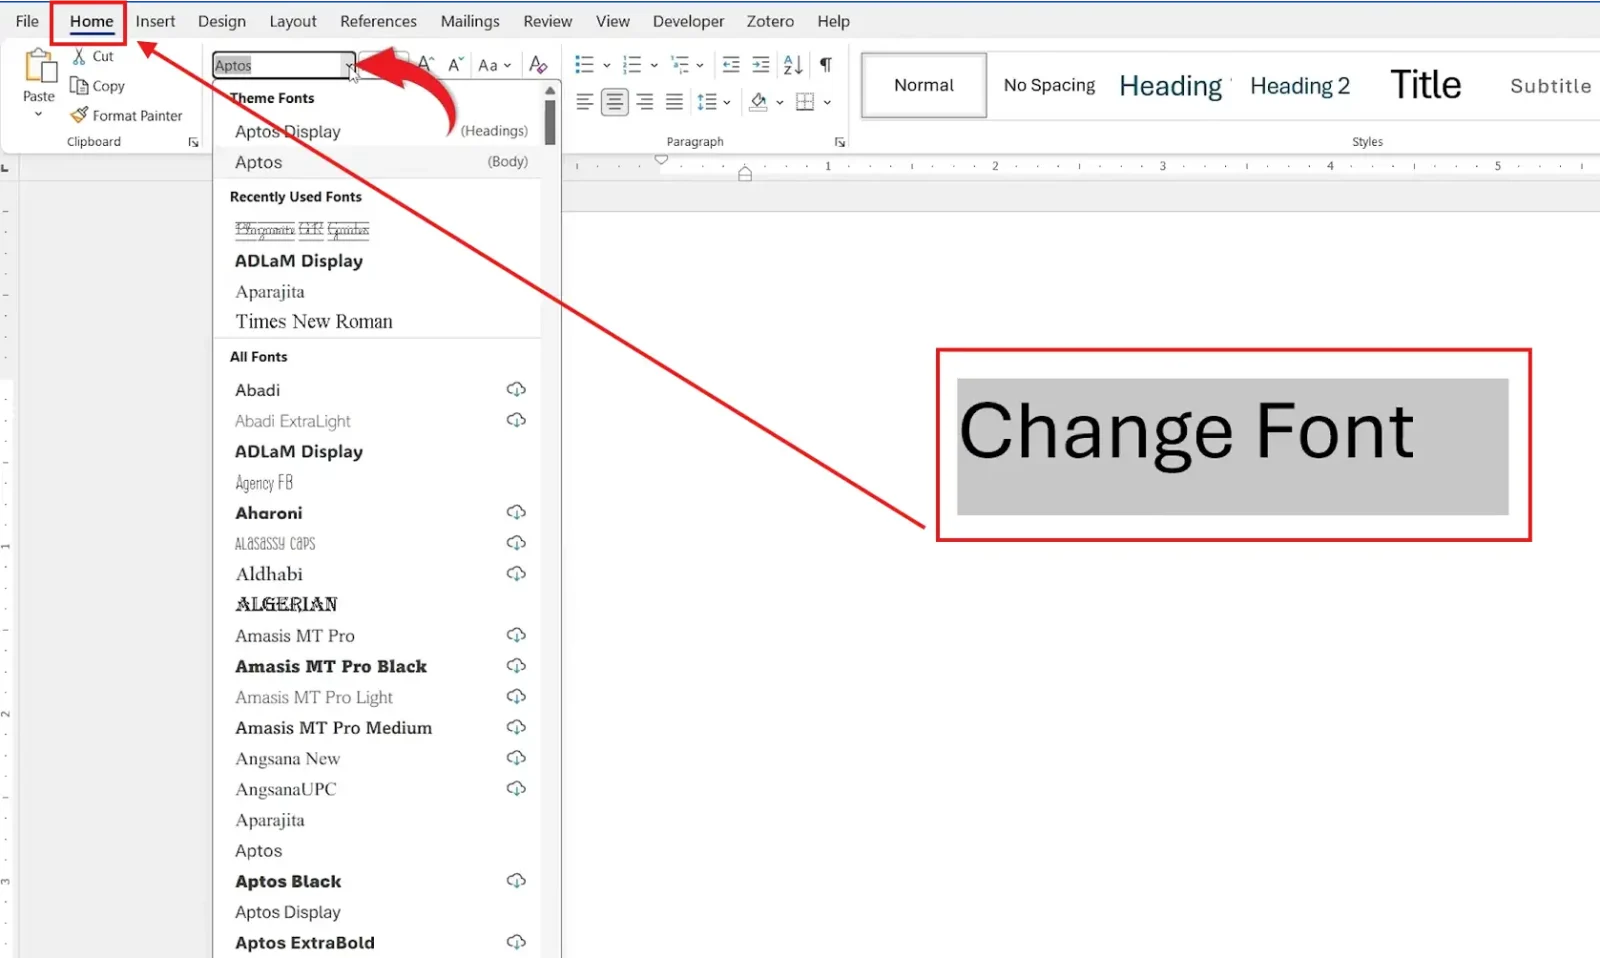
? Your selected text instantly updates to the new font.
Popular Fonts in Word
Some commonly used fonts include:
| Font | Best For |
|---|---|
| Arial | Professional documents |
| Calibri | General use |
| Times New Roman | Academic writing |
| Aptos | Modern default Word font |
| Verdana | Easy readability |
| Georgia | Elegant documents |
Method 2: How to Change the Font in Word Using Live Preview
Word can preview a font on your actual text before you commit to it, which saves time when comparing styles.
Steps:
- Select your text and open the Font dropdown on the Home tab
- Hover over any font in the list without clicking
- Word shows a live preview of your text in that font
- Click the font you want to apply it
? Live preview lets you compare styles instantly before changing anything permanently.
Method 3: How to Change the Font in Word as the Default
If you always use the same font, set it as the default so every new document starts with it.
Steps:
- Open the Font dialog box by clicking the small arrow in the Font section, or press Ctrl + D
- Select your preferred font
- Click Set As Default
You can apply the change to:
- This document only — affects the current file
- All documents based on the Normal template — affects every future Word document
? Word now opens new documents in your chosen font automatically.
Which Method Should You Use?
| Method | Best For |
|---|---|
| Font dropdown | Quick, one-off font changes on selected text |
| Live preview | Comparing fonts before committing to one |
| Set As Default | Using one font in every new document automatically |
Common Problems When Changing Fonts
Font won’t change
Make sure the text is selected before choosing a new font. Without a selection, Word has nothing to restyle.
Some fonts are missing
Certain fonts may not be installed on your computer. Install the font on your device and it will appear in the list — and if you want to add one, see the guide on how to add a new font in Word.
Formatting looks inconsistent
Different styles in Word can apply different fonts automatically. Update the underlying style, or select all text and apply one font for consistency.
Font reverts after reopening
This happens when the change was applied to one document only. Use Set As Default and apply it to the Normal template to make it permanent.
Pro Tips for Fonts
- Stick to one or two fonts per document — one for headings, one for body text
- Use serif fonts like Times New Roman for print and sans-serif fonts like Arial for screens
- Combine your font choice with colour for emphasis — see the guide on how to change letter spacing in Word for finer typographic control
- Press Ctrl + A before changing a font to apply it across the whole document at once
FAQs
How do I change the font in Word?
To change the font in Word, select your text, go to the Home tab, and choose a new font from the Font dropdown menu.
What is the default font in Microsoft Word?
Most newer versions of Word use Aptos as the default font, replacing Calibri from earlier versions.
Can I change the default font permanently?
Yes. Open the Font dialog box with Ctrl + D, select Set As Default, and apply it to all documents based on the Normal template.
What is the shortcut to select all text in Word?
Press Ctrl + A to select all text — find more in the Microsoft Word keyboard shortcuts cheat sheet.
Why are some fonts not showing in Word?
They are likely not installed on your computer. Install the font through your operating system and restart Word to see it in the list.
How do I change the font for headings only?
Modify the Heading style on the Home tab rather than each heading by hand, so the font updates across every heading at once.
How do I change the font size as well?
Use the size box next to the font dropdown. For a full walkthrough, see the guide on how to change font size in Word.
Conclusion
Learning how to change the font in Word is a simple but effective way to improve document appearance and readability.
Use the Font dropdown for quick changes, live preview to compare styles, and Set As Default when you want one font everywhere.
Once your font is set, finish the look by learning how to use bold, italic, and underline in Word for clean, consistent emphasis.
Related Tutorials

Recent Microsoft Word Tutorials

Looking for more help with Microsoft Word? Browse all step-by-step Word tutorials covering formatting, layout, pages, and document setup.
? View all Microsoft Word tutorials: https://wordmadeeasy.halmanweb.com/microsoft-word/
? Need more support – check out the official guidance: https://support.microsoft.com/en-au

Prefer watching instead of reading? Many Word tutorials are also available as short, step-by-step videos on the Word Made Easy YouTube channel.