The fastest way to change letter spacing in Word is from the Font dialog — select your text, open Font Settings ? Advanced, then choose Expanded to stretch the letters apart or Condensed to pull them closer together. The whole adjustment takes about ten seconds and works on a single word, a heading, or the entire document.
In this guide, you’ll learn how to expand letter spacing for headings, condense it to fit text into a tight layout, set the exact spacing value in points, and fix the most common spacing mistakes that make documents look uneven or unreadable.
What Is Letter Spacing in Word?
Letter spacing — Microsoft Word calls it character spacing in the Font dialog — controls the horizontal distance between individual characters. It is different from line spacing, which controls the vertical distance between rows of text. Letter spacing in Word has three settings:
- Normal — the default font kerning, no adjustment applied
- Expanded — adds extra space between every character, measured in points
- Condensed — removes space between every character, also measured in points
A 0.5 pt to 1 pt change is usually invisible at body-text size but transforms the look of headings, covers, and titles. For vertical spacing adjustments instead, see the guide on how to change line spacing in Microsoft Word.
Watch the Video Tutorial
If you prefer to see this in action, the full video walkthrough is below, showing each method step by step.
How to Change Letter Spacing in Word: Step-by-Step
The full workflow has three stages: expand the spacing to stretch text, condense it to tighten text, then set an exact point value for precision work. Each method below covers one stage.
Method 1: How to Change Letter Spacing in Word Using Expanded
Expanded spacing pushes characters apart and is the right choice for headings, titles, and any text you want to feel airy or premium.
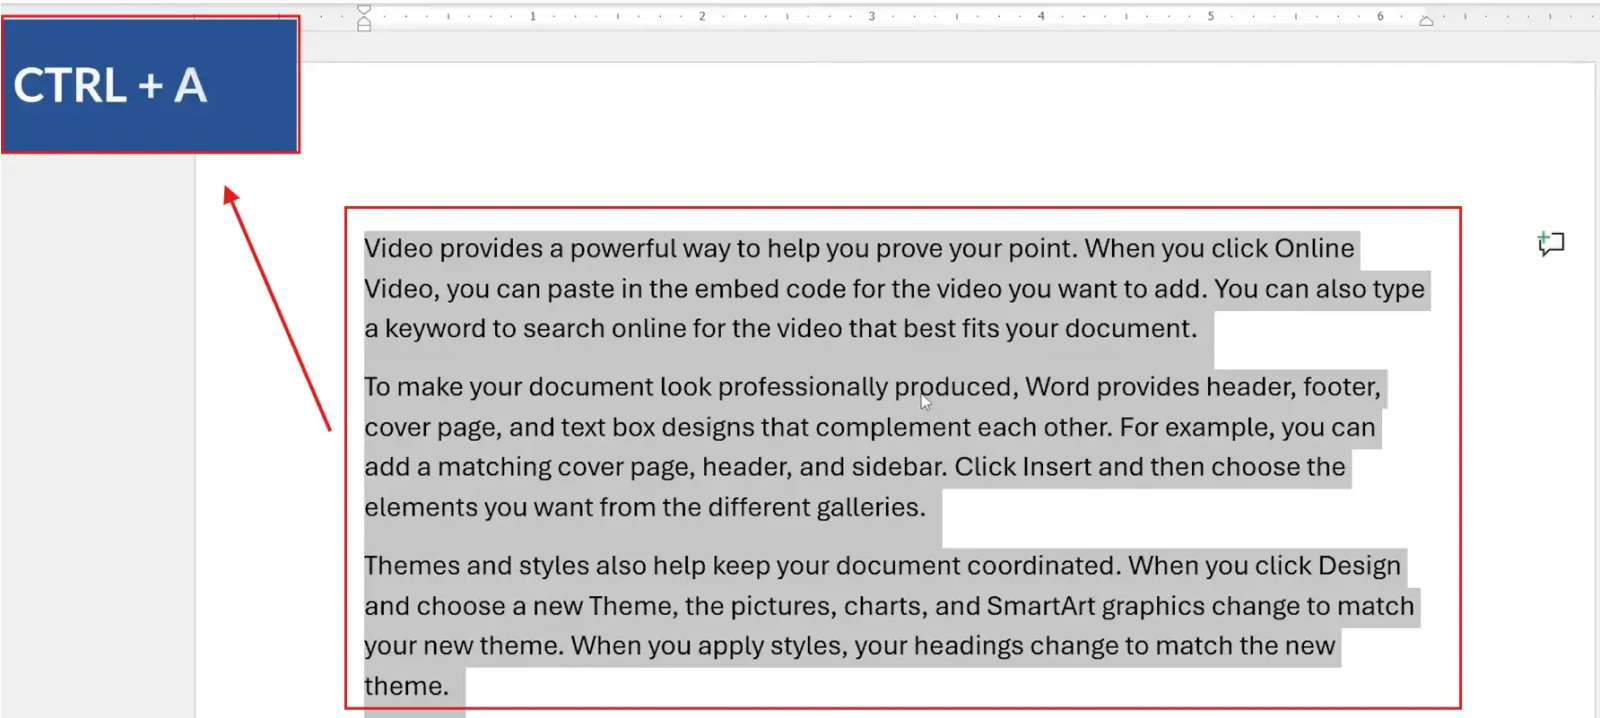
- Select the text you want to modify — click and drag for a single word or heading, or press Ctrl + A to select the entire document
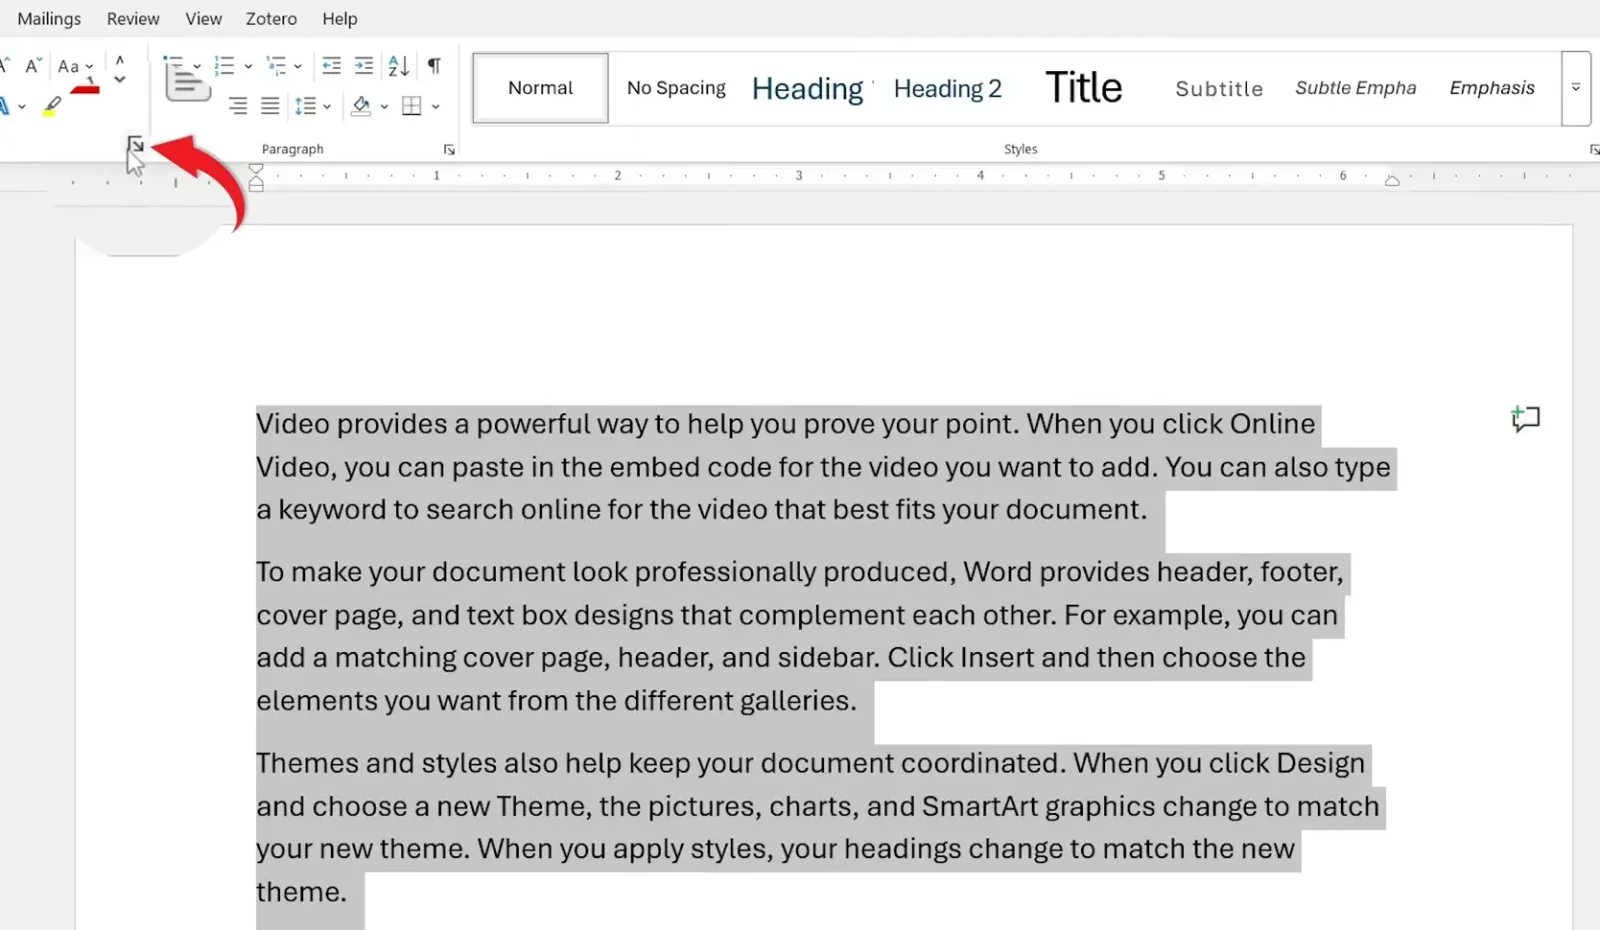
- Open the Home tab and click the small arrow in the bottom-right corner of the Font group to open the Font dialog
- Click the Advanced tab in the Font dialog
- Under Character Spacing, set Spacing to Expanded
- Set the By value (start with 1 pt for a subtle effect, 2-3 pt for headings)
- Click OK
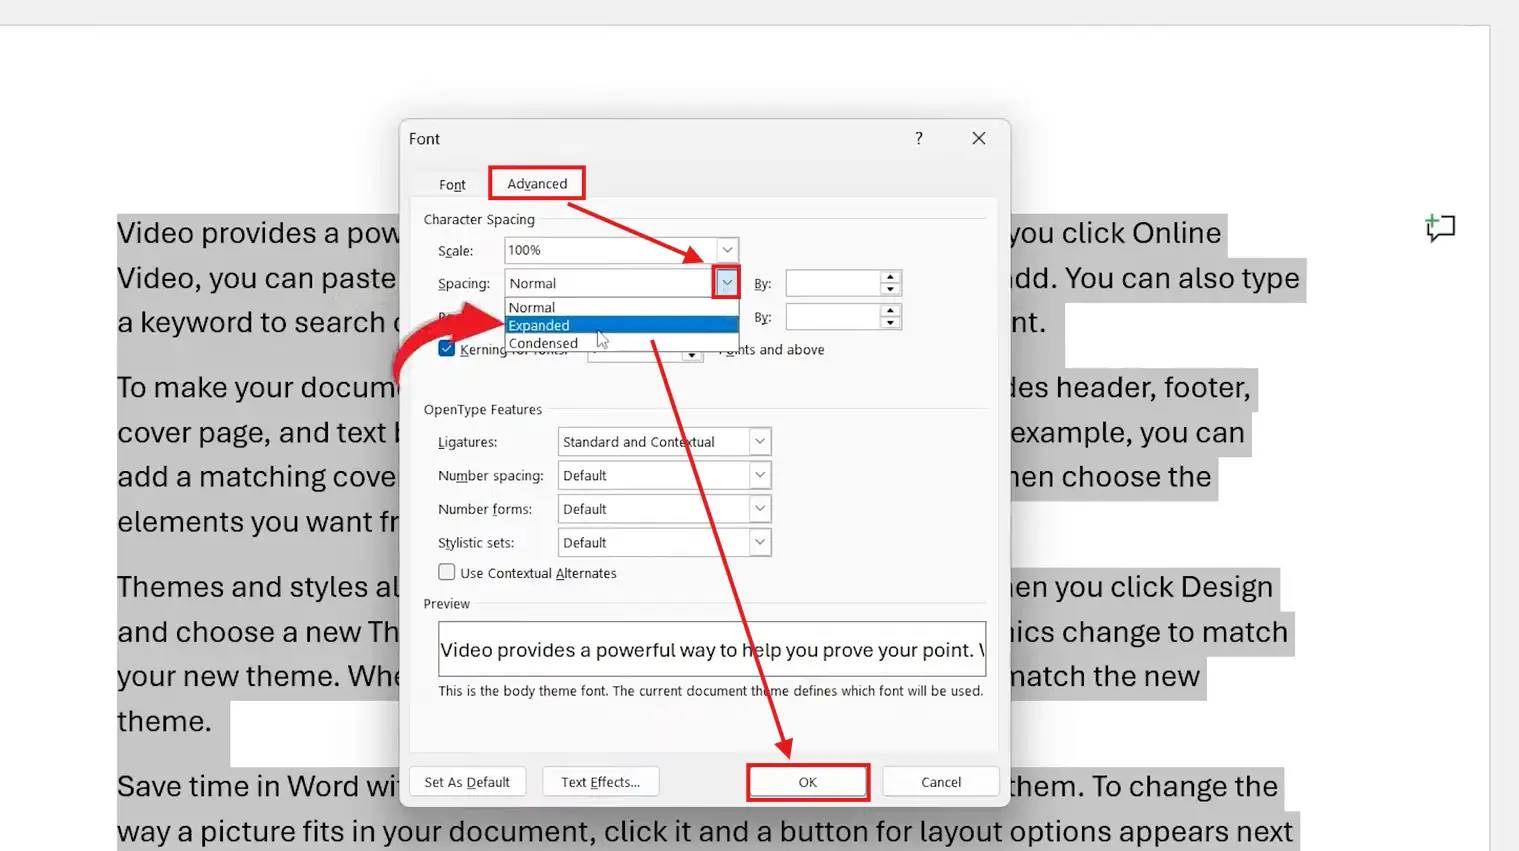
? The selected text spreads out — each character now sits the chosen distance further from its neighbour. The effect is most visible on uppercase headings.
Method 2: How to Change Letter Spacing in Word Using Condensed
Condensed spacing pulls characters closer together. Use it to fit a long heading onto a single line, tighten a CV name, or fix awkward gaps in a tracked-out font.
- Select the text you want to condense
- Open the Font dialog from Home ? Font (small arrow)
- Switch to the Advanced tab
- Under Character Spacing, set Spacing to Condensed
- Set the By value to 0.3 pt for body text or up to 1 pt for headings
- Click OK
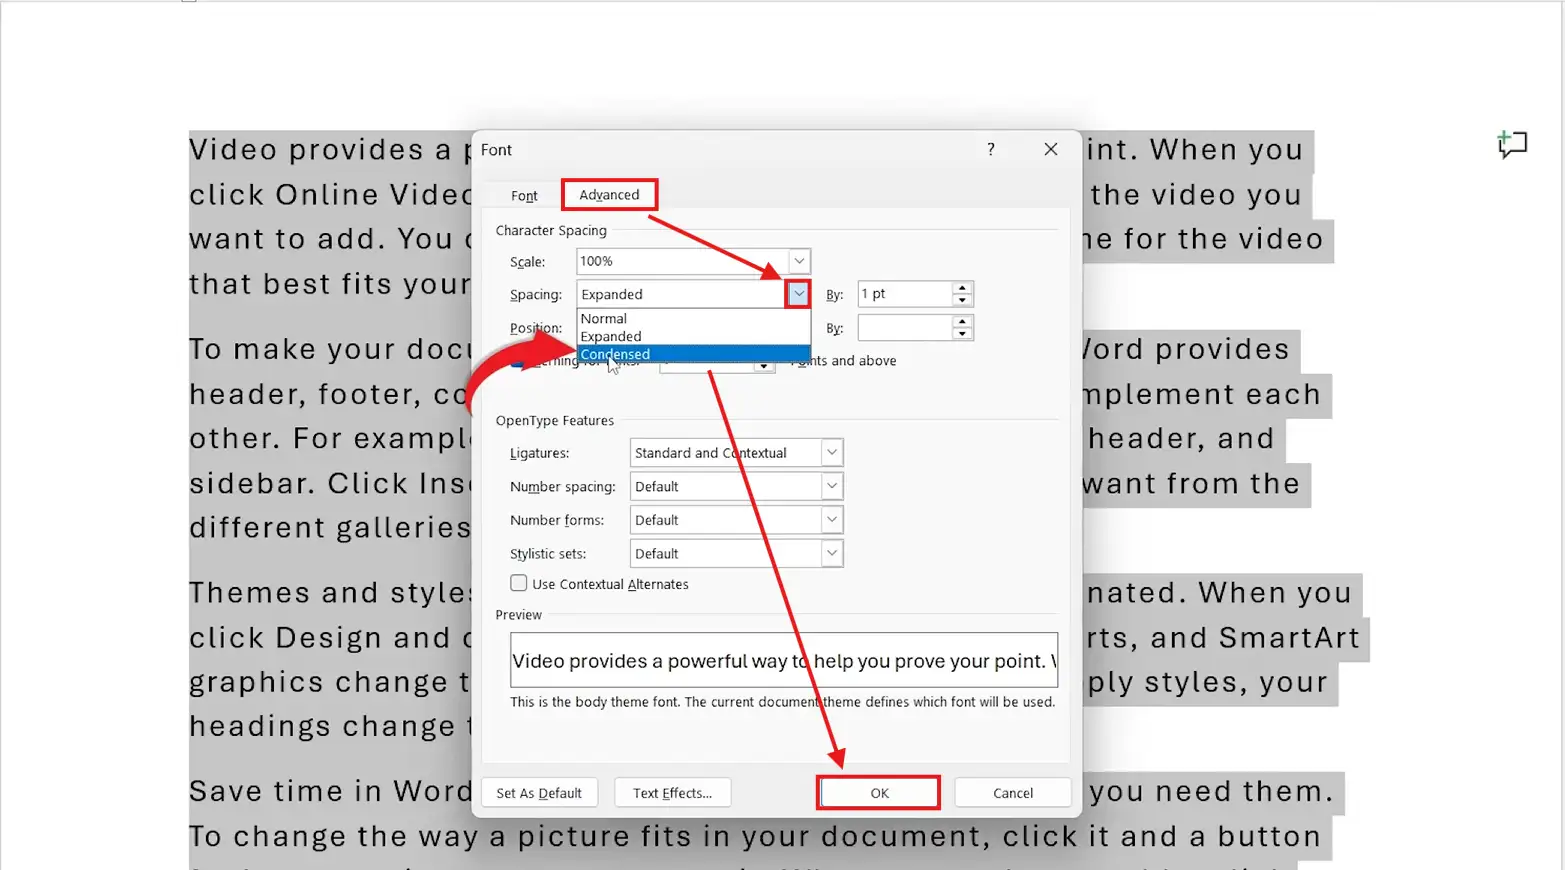
? The text becomes more compact. Don’t condense by more than 1 pt on body text — readability falls off sharply past that point.
Method 3: How to Change Letter Spacing in Word with an Exact Point Value
The By field accepts decimal values from 0.1 pt upwards, giving you precision control for brand work, certificates, and design-led documents.
- Select your text and open the Font dialog ? Advanced tab
- Choose Expanded or Condensed from the Spacing dropdown
- Click directly in the By field and type the exact value (for example, 0.7 for a fine adjustment)
- Watch the Preview pane at the bottom of the dialog to judge the effect before committing
- Click OK
? Recommended starting values: 0.5 pt expanded for body text, 1-2 pt expanded for headings, 0.3 pt condensed to subtly shorten a runaway title, 3-5 pt expanded for the “tracked out” magazine-cover look.
Which Method Should You Use?
| Method | Best For | Effort |
|---|---|---|
| Expanded (1-2 pt) | Headings, titles, covers, premium-feel branding | Low |
| Condensed (0.3-1 pt) | Fitting long titles on one line, tightening CV names, compact tables | Low |
| Exact By value | Brand guidelines, certificates, fine typography work | Medium |
For everyday documents, Method 1 covers the look you actually want — stretched headings on top of normal body text. Use Method 2 only when you have a real space constraint, and Method 3 when matching brand specs.
Common Problems When Changing Letter Spacing in Word
The spacing applied to the whole document instead of the selection
You opened the Font dialog with nothing selected, or with the cursor placed but no text highlighted. Press Ctrl + Z to undo, click and drag to select only the text you want to change, then reopen the Font dialog.
The text looks uneven or jumpy
Different paragraphs have different spacing values. Select the whole section, open the Font dialog, and set Spacing back to Normal to reset, then reapply your chosen value uniformly across the section.
Condensed text is hard to read
You’ve pulled the spacing in too far. Body text shouldn’t be condensed by more than 0.5 pt, and headings shouldn’t go past 1 pt. Open the Font dialog and reduce the By value, or switch back to Normal and try a smaller adjustment.
Letter spacing resets when I change the font
Changing the font through a style or theme can reset character spacing. Apply the font first, then apply the letter spacing — and if you want spacing to persist across new documents, the guide on how to change the default font in Microsoft Word covers saving font and spacing settings as the default.
Pro Tips for Better Character Spacing in Word
- Keep body text at Normal spacing — only adjust headings, titles, and short display lines, or readability suffers
- Pair expanded spacing with uppercase headings for a magazine-cover look — a 2 pt expansion on all-caps text is the classic editorial setup
- Watch the Preview pane at the bottom of the Font dialog rather than committing and undoing — it shows the change in real time
- Combine letter spacing with line spacing for the cleanest result on long documents — and the guide on how to change line spacing in Microsoft Word covers the vertical side of the same job
FAQs
How do I change letter spacing in Word?
Select the text, click the small arrow in the bottom-right of the Home ? Font group, switch to the Advanced tab, and set Spacing to Expanded or Condensed. Enter a point value in the By field and click OK.
What is the difference between Expanded and Condensed spacing?
Expanded adds horizontal space between characters, making text look more open and airy — best for headings and titles. Condensed removes space between characters, making text more compact — best for fitting long lines into tight layouts.
What is the difference between letter spacing and line spacing?
Letter spacing is horizontal — it controls the gap between individual characters on the same line. Line spacing is vertical — it controls the gap between rows of text. Both are set independently and serve different design purposes.
Can I change letter spacing on only part of the document?
Yes. Highlight only the words, lines, or paragraphs you want to adjust before opening the Font dialog. The change applies to the selection only and the rest of the document is untouched.
What point value should I use for headings?
For most heading styles, 1-2 pt Expanded is the editorial standard. For all-caps headings or magazine-cover looks, push to 3-5 pt Expanded. Keep body text at Normal or no more than 0.5 pt Expanded.
How do I reset letter spacing back to default?
Select the text, open the Font dialog ? Advanced tab, set Spacing back to Normal, and click OK. The selection returns to the font’s built-in default character spacing.
Does letter spacing work in all versions of Word?
Yes on every modern desktop version — Word 2013, 2016, 2019, 2021, and Microsoft 365. Word for the web has a more limited Font dialog, so do precise spacing work in the desktop app.
Conclusion
Once you know how to change letter spacing in Word, you have a fast way to fix uneven headings, fit long titles onto a single line, and add a polished, editorial feel to any document. Expanded for headings, Condensed for tight layouts, and an exact By value when brand specs demand precision — those three controls cover almost every spacing job you’ll meet.
Keep body text at Normal spacing, push headings 1-2 pt Expanded, and always preview before printing. If you are designing the rest of the document layout at the same time, the guide on how to align text in Microsoft Word is the natural next step.
Related Tutorials
- How to Change Line Spacing in Microsoft Word
- How to Change the Default Font in Microsoft Word
- How to Align Text in Microsoft Word

Recent Microsoft Word Tutorials

Looking for more help with Microsoft Word? Browse all step-by-step Word tutorials covering formatting, layout, pages, and document setup.
? View all Microsoft Word tutorials: https://wordmadeeasy.halmanweb.com/microsoft-word/
? Need more support – check out the official guidance: https://support.microsoft.com/en-au

Prefer watching instead of reading? Many Word tutorials are also available as short, step-by-step videos on the Word Made Easy YouTube channel.