If you want to learn how to justify text in Word, this guide covers the 3 easiest methods. Knowing how to justify text in Word lets you create cleaner, more professional documents with text aligned evenly along both the left and right margins. You’ll learn how to justify text in Word using the toolbar button, keyboard shortcuts, and the Paragraph settings dialog.
Formatting text properly in Microsoft Word makes your documents look polished — and learning how to align text in Word is one of the most important formatting skills to master.
What Does Justify Text Mean in Word?
Before you learn how to justify text in Word, it helps to understand what it means. Justified text is aligned evenly on both sides of the page. Unlike left-aligned text, which leaves a ragged right edge, justified text creates a clean and balanced appearance.
This formatting style is commonly used in:
- Books and magazines
- Business reports
- Academic documents
- Newsletters and brochures
Watch the Video Tutorial
If you prefer to see this in action, the full video walkthrough is below, showing each method step by step.
Method 1: How to Justify Text in Word Using the Toolbar Button
This is the easiest way to justify text in Word and works in all modern versions including Word for Microsoft 365, Word 2021, and earlier.
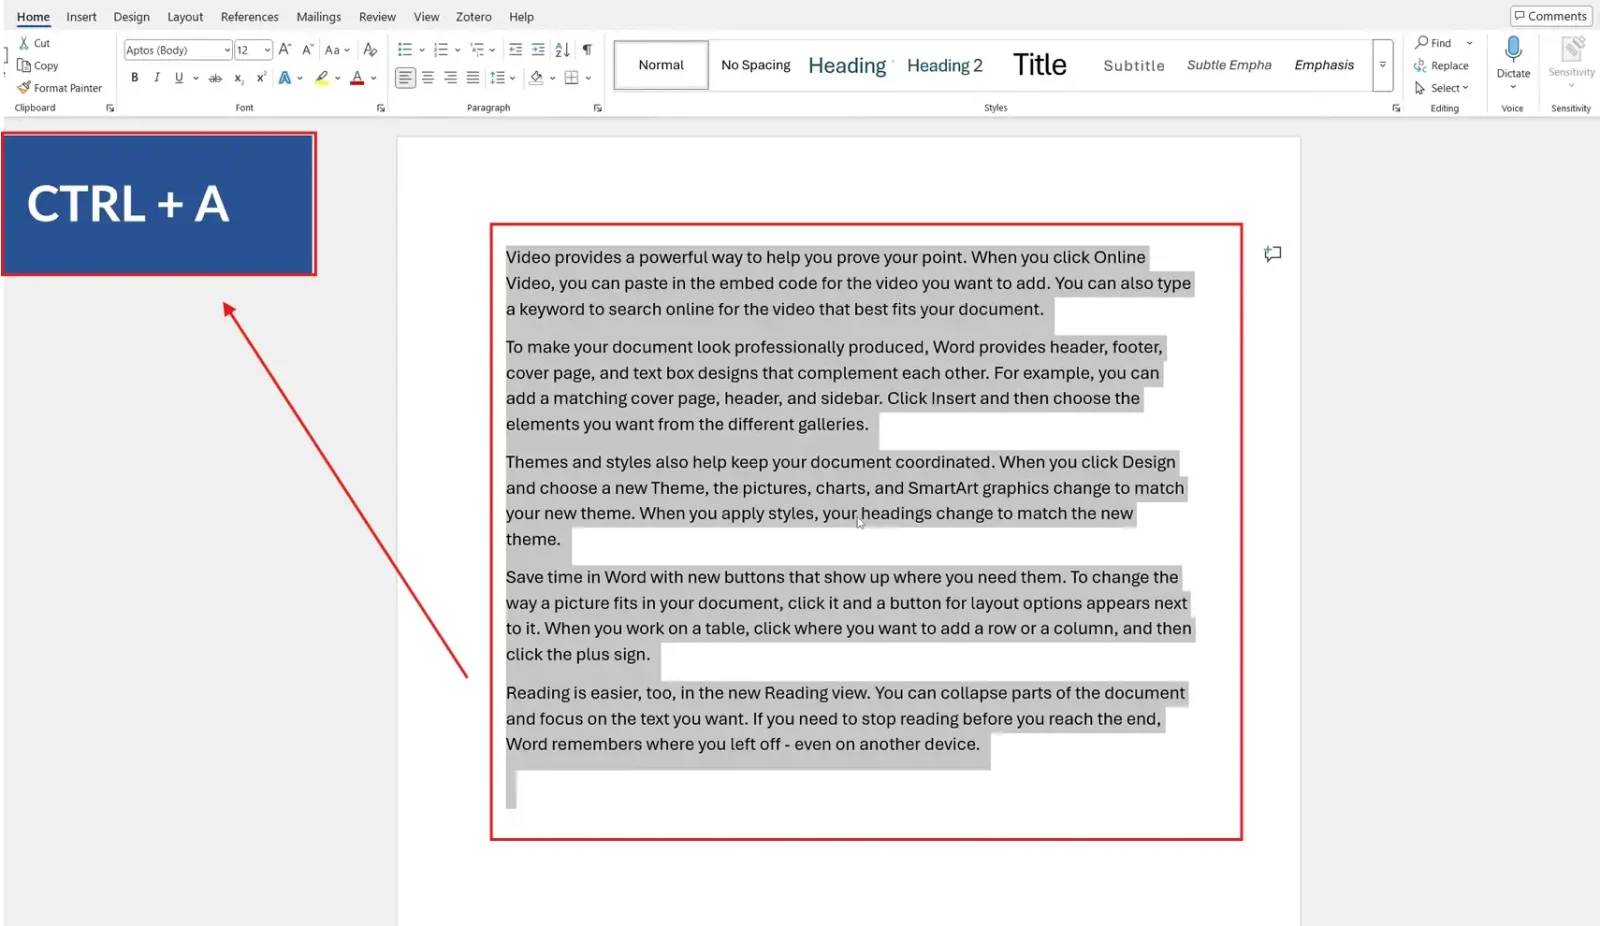
Step 1: Select Your Text
- Click and drag your cursor to highlight specific text, or
- Press Ctrl + A to select all text in the document
Step 2: Click the Justify Button
- Go to the Home tab
- Locate the Paragraph section
- Click the Justify icon (four equal horizontal lines)
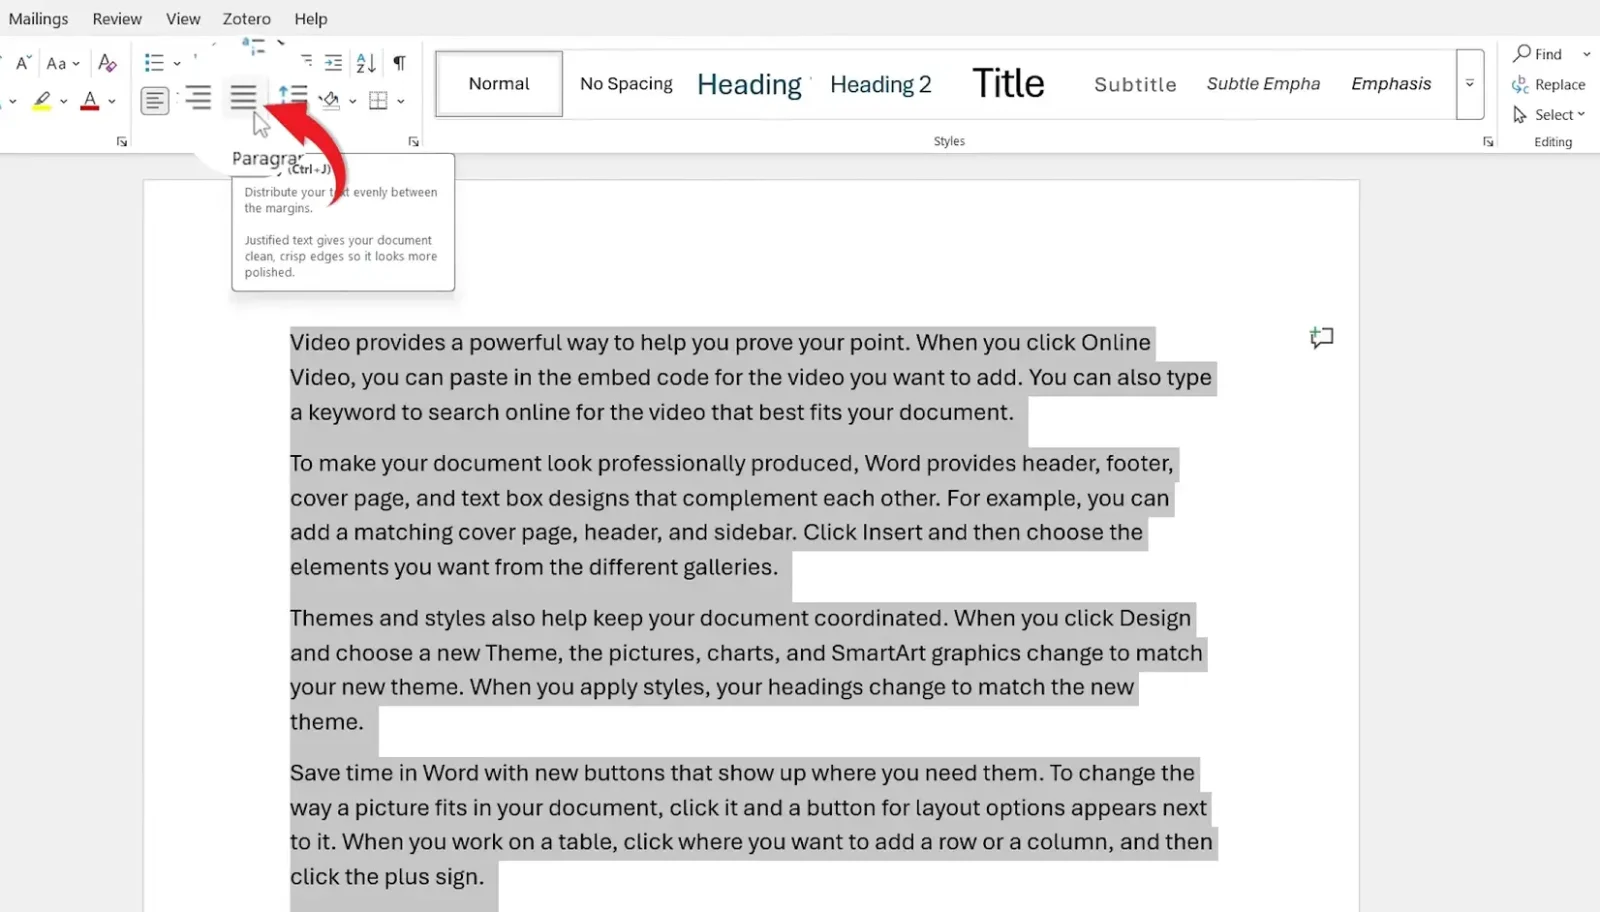
? Result: Your text will instantly align evenly on both the left and right margins.
Method 2: How to Justify Text in Word Using a Keyboard Shortcut
The fastest way to justify text in Word is with a keyboard shortcut. This works instantly without taking your hands off the keyboard.
Steps:
- Select your text (or press Ctrl + A to select all)
- Press Ctrl + J
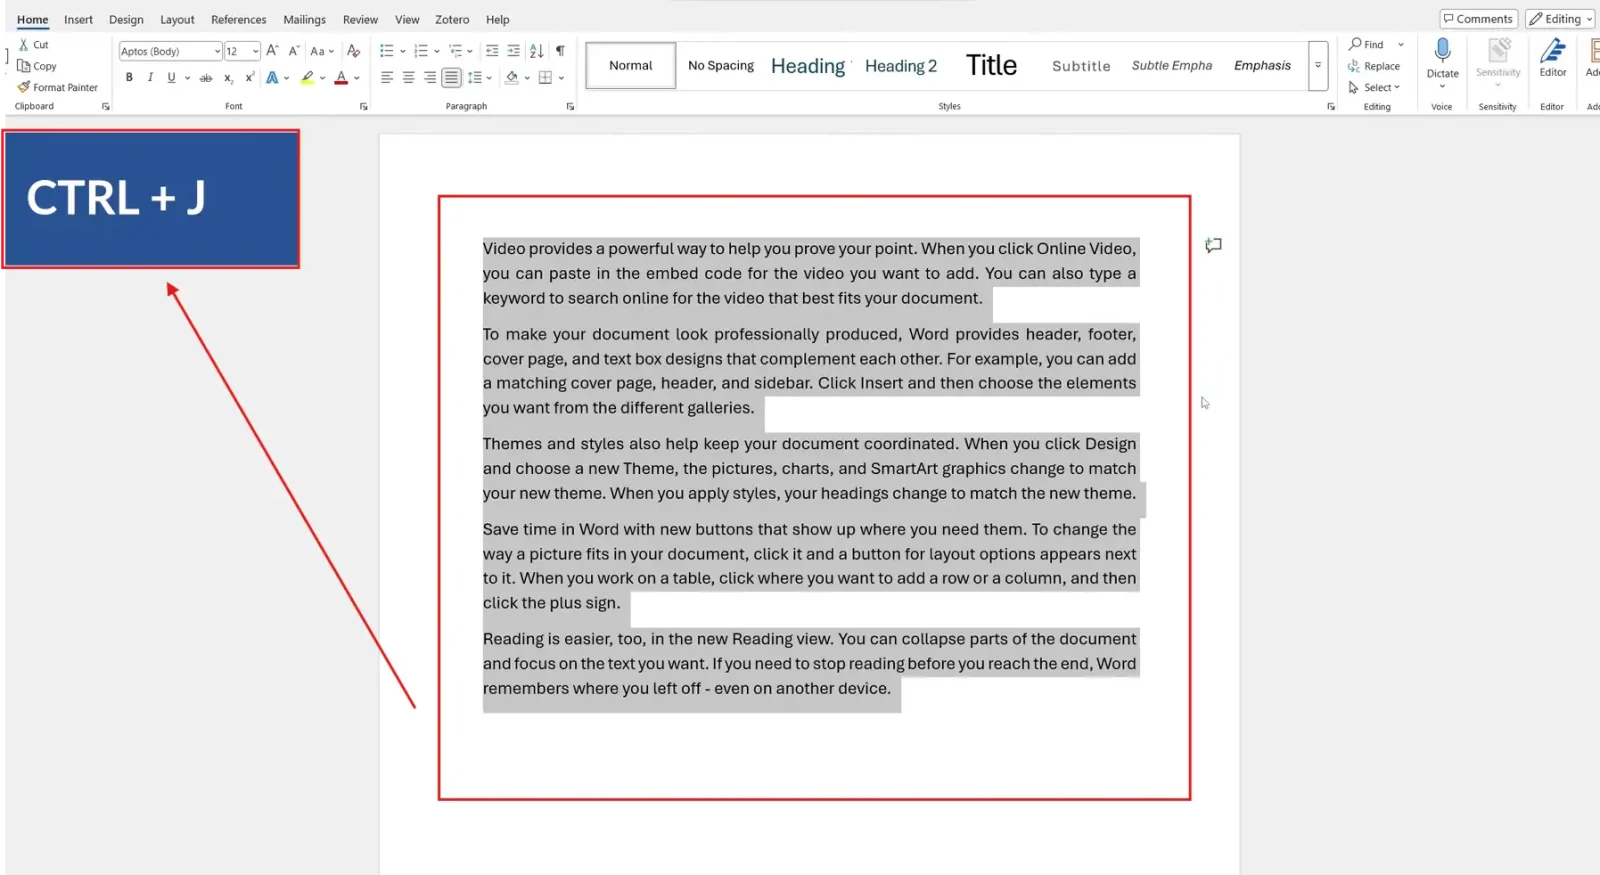
? Result: The selected text becomes justified immediately.
Other useful alignment shortcuts to remember:
- Ctrl + L — Align Left (removes justification)
- Ctrl + E — Center
- Ctrl + R — Align Right
- Ctrl + J — Justify
Method 3: How to Justify Text in Word Using Paragraph Settings
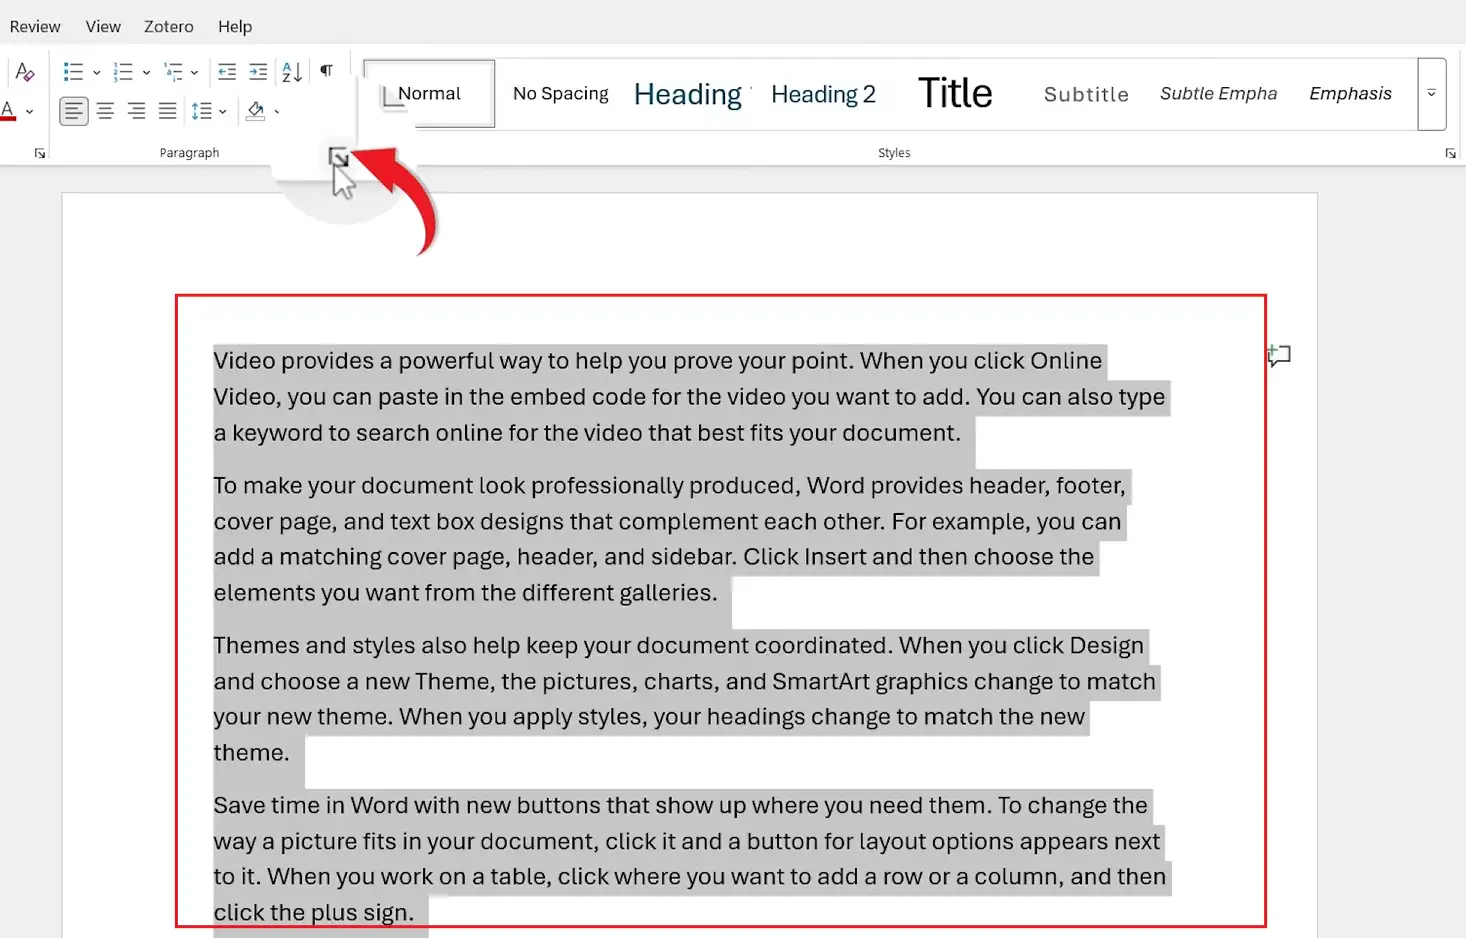
For more control, you can also justify text in Word through the Paragraph dialog box. This method is useful when you want to combine justification with other formatting options like indentation or line spacing.
Steps:
- Select your text
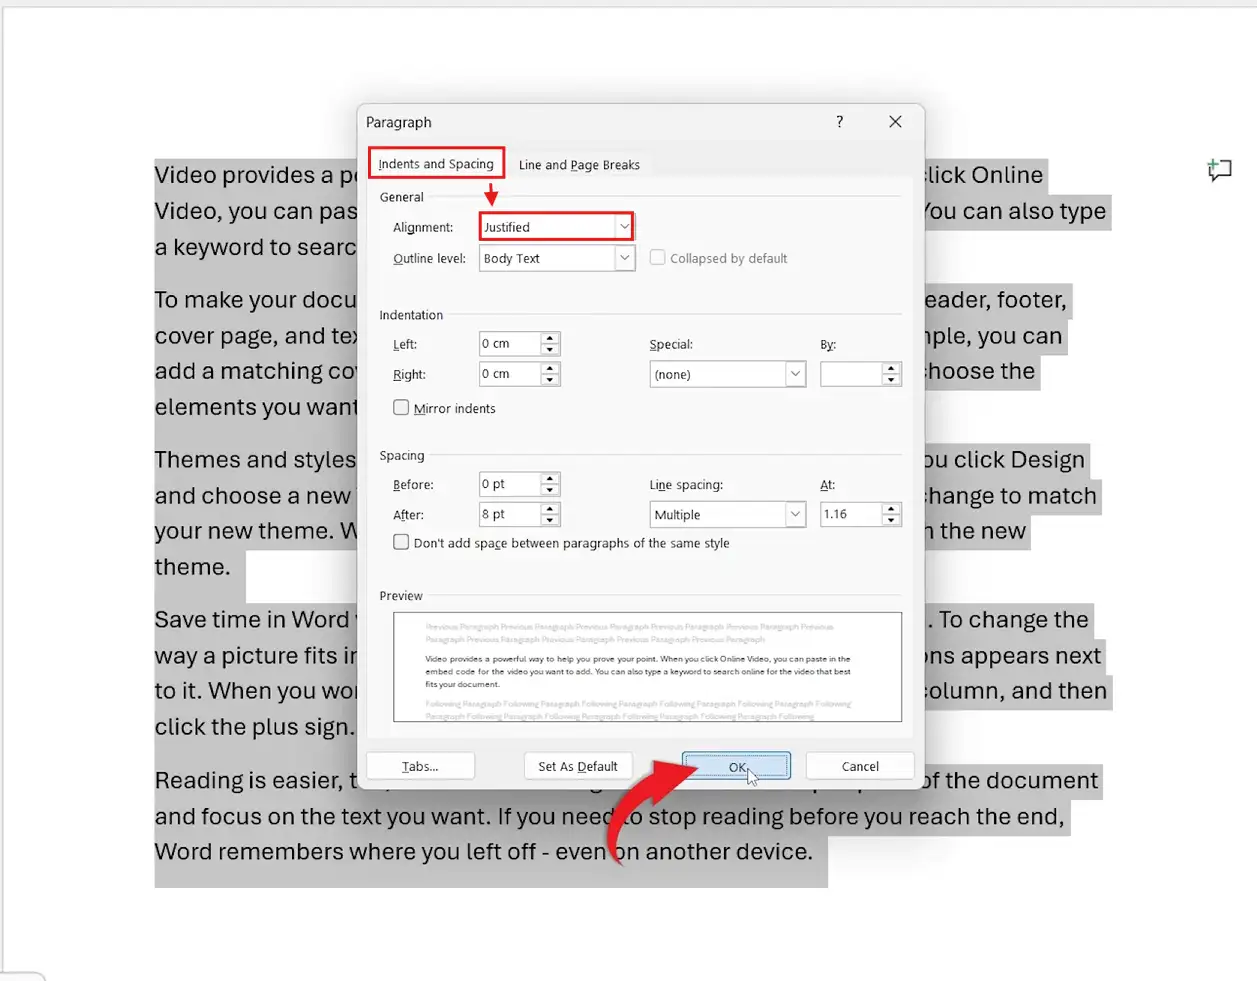
- Click the small arrow in the bottom-right corner of the Paragraph section
- Under Alignment, click the dropdown menu
- Select Justified
- Click OK
When to Use Justified Text
Justified text works best for:
- Professional documents and reports
- Printed materials like books and magazines
- Long paragraphs with consistent text flow
- Academic essays and dissertations
- Newsletters, brochures, and publications
Avoid justified text for:
- Short paragraphs or single lines
- Bullet point lists
- Web content (left alignment is standard online)
- Documents with narrow columns
Advantages of Justified Text in Word
Professional Appearance
Creates neat and symmetrical document edges that look polished and formal.
Improved Readability for Long Text
Makes large blocks of text easier to follow in formal layouts like reports and books.
Consistent Formatting
Helps documents look organised and polished across multiple pages.
Common Issues When Justifying Text in Word
Large Gaps Between Words
When you justify text in Word, it can sometimes stretch spaces awkwardly between words. This is the most common complaint about justified text.
Fixes:
- Enable hyphenation (Layout ? Hyphenation ? Automatic)
- Reduce paragraph width by adjusting margins
- Use a readable font size (10-12pt for body text)
- Avoid very long words that can’t break across lines
Text Looks Uneven
If your justified text looks uneven, check for:
- Manual line breaks (Shift + Enter) — replace with regular Enter
- Extra spaces between words
- Incorrect paragraph formatting
How to Remove Justification in Word
To return justified text to normal alignment in Word:
- Select the text
- Click Align Left in the Paragraph section, or press Ctrl + L
Pro Tips for Better Text Formatting
Follow these tips when you justify text in Word for cleaner, more professional results:
- Combine justified text with properly set margins in Word for a balanced, polished layout
- Use readable fonts like Arial, Calibri, or Times New Roman
- Avoid justifying very short paragraphs — they can look stretched
- Always preview the document before printing
- Enable automatic hyphenation to reduce awkward word spacing
FAQs
What is the shortcut to justify text in Word?
The keyboard shortcut to justify text in Word is Ctrl + J. Select your text first, then press the shortcut. This works in all modern versions of Word.
How do I justify text in Word on a Mac?
On a Mac, the shortcut to justify text in Word is Cmd + J. Alternatively, use the Justify button in the Home tab Paragraph section.
What’s the difference between left align and justify?
Left align keeps the right edge of text uneven (ragged). Justify aligns text evenly on both the left and right margins by stretching the spaces between words.
Can I justify only part of a document?
Yes. Simply select the specific text you want to justify before applying the formatting — and if you need to control where lines start as well, see the guide on how to indent in Word.
Why does justified text create big spaces?
Word stretches the spaces between words to make both margins align evenly. This is most noticeable in narrow columns or when long words can’t fit on a line. Enabling hyphenation usually fixes this.
How do I undo justified text in Word?
Press Ctrl + L to switch back to left alignment, or click the Align Left button in the Paragraph section of the Home tab.
Should I always justify text in Word documents?
No. Justified text works well for formal documents, books, and reports. For everyday letters, emails, or web content, left alignment is more appropriate and easier to read.
Conclusion
Now that you know how to justify text in Word three different ways — using the toolbar button, the Ctrl + J keyboard shortcut, and the Paragraph settings dialog — you can pick whichever method suits the document you’re working on.
For everyday formatting, the Ctrl + J shortcut is the fastest. For a visual approach, the toolbar button is most intuitive. For full control combined with other paragraph settings, the Paragraph dialog gives you the most flexibility. Once you understand how to justify text in Word, you can improve the readability and appearance of reports, books, and business documents with ease.
Related Tutorials

Recent Microsoft Word Tutorials

Looking for more help with Microsoft Word? Browse all step-by-step Word tutorials covering formatting, layout, pages, and document setup.
? View all Microsoft Word tutorials: https://wordmadeeasy.halmanweb.com/microsoft-word/
? Need more support – check out the official guidance: https://support.microsoft.com/en-au

Prefer watching instead of reading? Many Word tutorials are also available as short, step-by-step videos on the Word Made Easy YouTube channel.