If you want to print a booklet in Word, the trick isn’t the printing — it’s the setup. Once you switch the layout to Book Fold and set a sensible gutter margin, Word reorders every page automatically so the finished print folds into a proper booklet. The whole thing takes about three minutes.
In this guide, you’ll learn how to enable Book Fold layout, adjust the gutter margin so nothing gets lost in the fold, pick the right paper size, and handle double-sided printing whether your printer supports automatic duplex or not.
What Is Booklet Printing in Word?
Booklet printing arranges your pages so that when they come off the printer, stack them in order, fold them down the middle, and you’ve got a proper book — pages 1, 2, 3, 4 in the right sequence rather than spread across the sheets in a random order.
Word handles the page reshuffling automatically once you set the layout. It’s especially useful for:
- Instruction manuals and user guides
- Event programs, wedding orders of service, and church bulletins
- Marketing brochures and product catalogues
- Short stories, zines, and self-published booklets
- School projects and training material
Instead of printing sequentially, Word reorganises pages into a Book Fold layout — two pages per sheet, in the exact order they need to be for folding.
Watch the Video Tutorial
If you prefer to see this in action, the full video walkthrough is below, showing each method step by step.
How to Print a Booklet in Word: Step-by-Step
There are five stages — enable Book Fold layout, adjust the gutter, pick a paper size, send to the printer, and handle duplex printing whether your printer supports it automatically or not. Follow them in order and Word handles the page reordering for you.
Method 1: How to Print a Booklet in Word Using Book Fold Layout
This is where the magic happens. Switching the layout to Book Fold tells Word to treat your document as a booklet — it flips the orientation to landscape, splits each sheet into two halves, and rearranges the page order automatically.
Steps to Enable Book Fold Layout
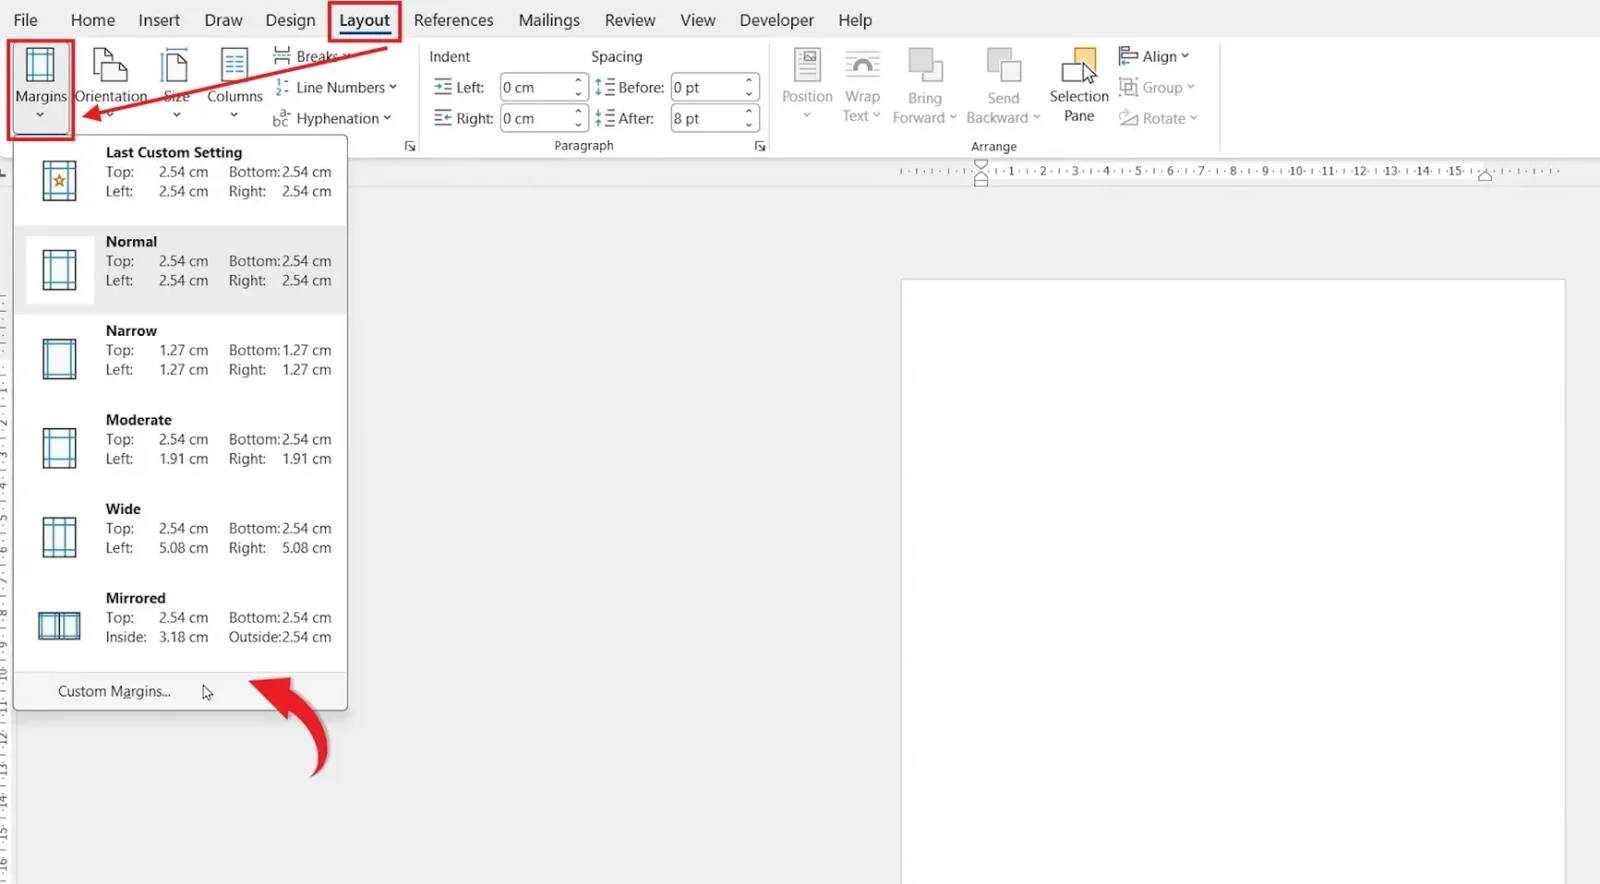
- Go to the Layout tab in the ribbon.
- Click Margins.
- Select Custom Margins at the bottom of the dropdown.
- In the Page Setup window, find the Multiple Pages dropdown.
- Select Book fold.
- Orientation switches to Landscape automatically — leave it that way.
- Click OK.
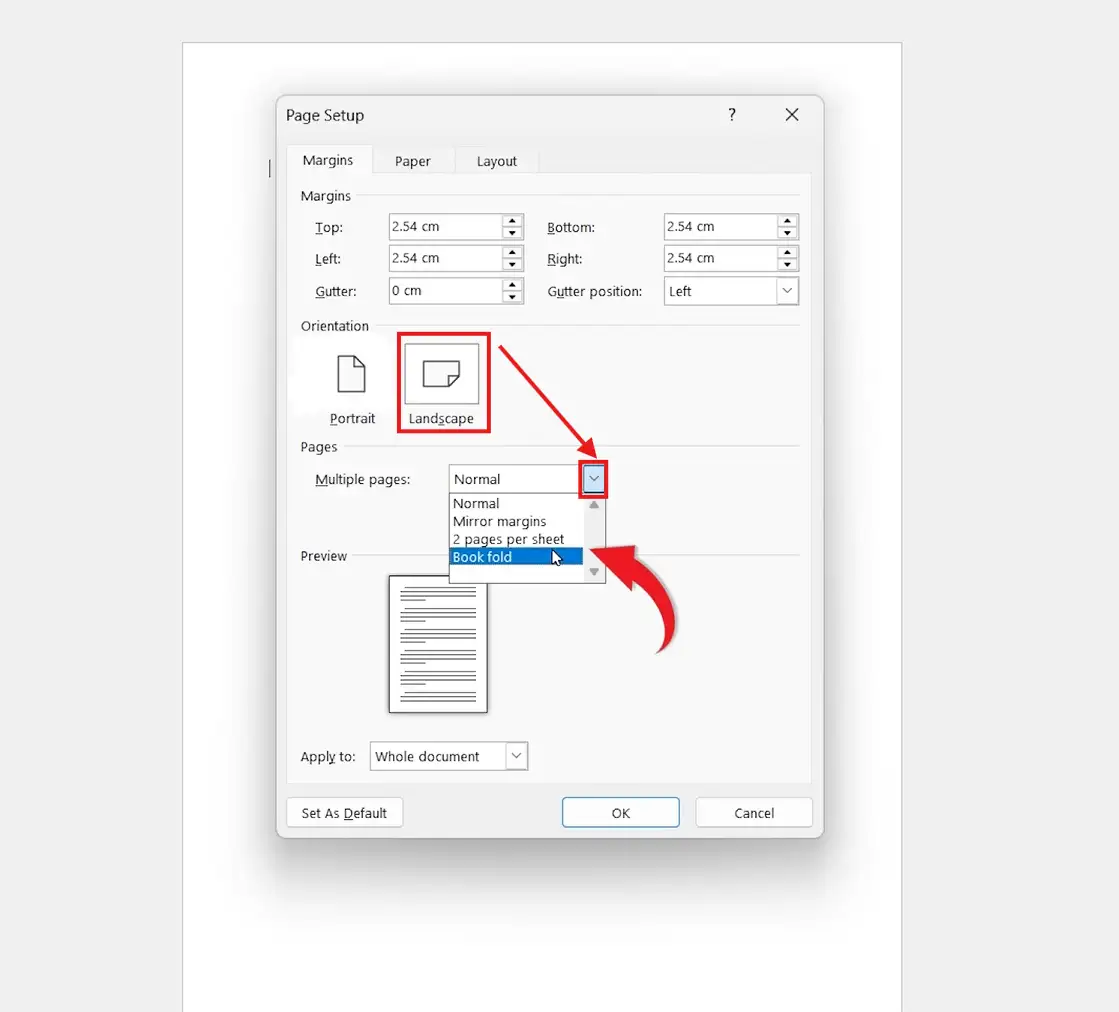
? Each page now displays at half the sheet size — that’s correct. When you print, Word fits two booklet pages onto every sheet of paper.
Method 2: How to Print a Booklet in Word with the Right Gutter Margin
The gutter is the extra space along the inner edge of each page — where the fold or binding will sit. Without it, text gets swallowed into the crease and the booklet looks amateurish. Setting a sensible gutter is the difference between a professional finish and a print job that’s hard to read.
Why the Gutter Matters
- Stops text and images disappearing into the fold
- Keeps the page comfortable to read once folded
- Leaves room for stapling or binding without sacrificing content
Steps to Adjust the Gutter
- Open the Page Setup window (Layout ? Margins ? Custom Margins) — exactly as you would when you adjust margins in Word for any standard document.
- Find the Gutter field.
- Set it to 0.5″ (1.27 cm) for a standard booklet, or 0.6″–0.8″ for thicker booklets with more pages.
- Click OK.
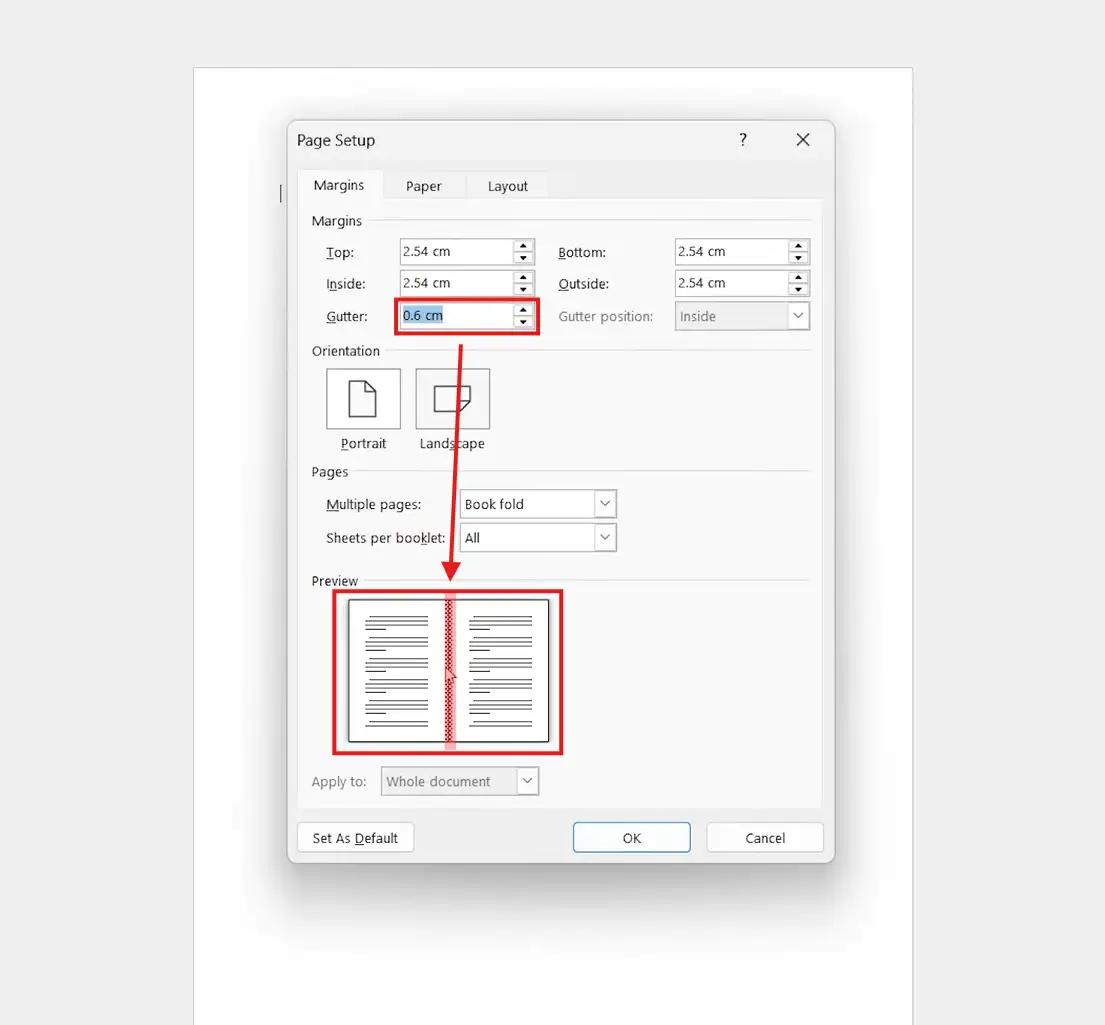
? The preview panel shows exactly where the non-printable fold zone sits — useful for checking your layout before you commit any paper.
Method 3: How to Print a Booklet in Word with the Right Paper Size
Paper size determines the final booklet dimensions. An A4 sheet folds in half to make an A5 booklet — the most common size. Letter size (8.5″ × 11″) folds into a half-letter booklet, which works for North American printers.
Steps to Set Paper Size
- In the Page Setup window, click the Paper tab.
- Choose your paper size from the dropdown — A4 for an A5 booklet, Letter for a half-letter booklet.
- Set the correct paper source (printer tray) if your printer has multiple options.
- Switch back to the Margins tab and confirm your settings look right.
- Click OK.

? Whatever paper size you choose, Word splits it in half for the booklet pages. An A4 sheet gives you two A5 pages per side — four booklet pages per sheet once printed double-sided.
Method 4: How to Print a Booklet in Word Using the Print Dialog
With the layout set, the print dialog is where you tell Word to print both sides and flip on the correct edge. Get the flip direction wrong and the back of every page ends up upside down.
Steps to Print the Booklet
- Press Ctrl + P to open the Print dialog.
- Under Settings, click the duplex dropdown (usually labelled Print One Sided).
- Select Print on Both Sides — then choose Flip pages on short edge.
- Confirm the printer and paper source are correct.
- Click Print.
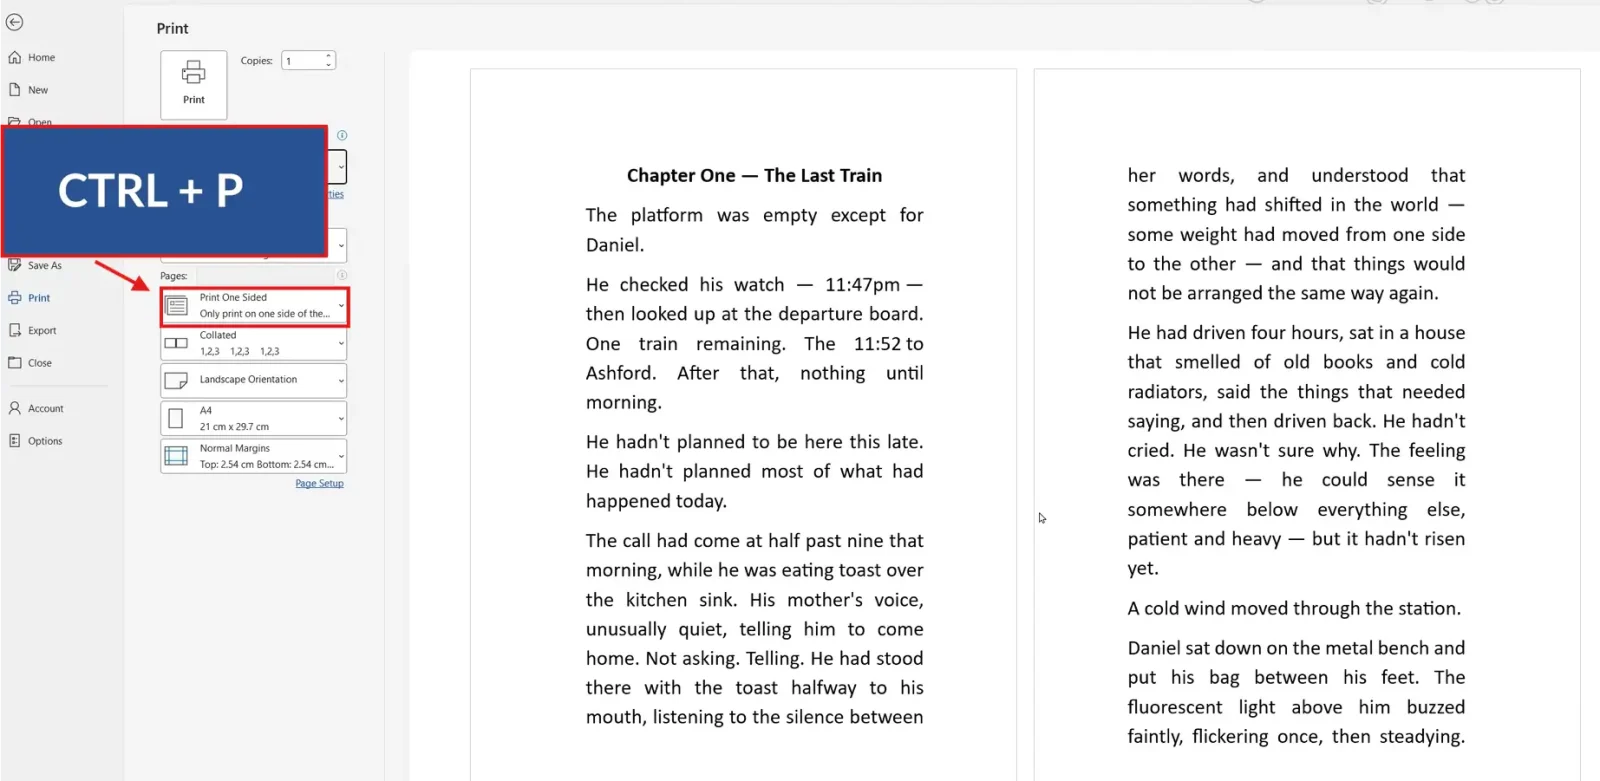
? Flip on short edge is the critical setting for booklets — flip on long edge gives you upside-down back pages. If your first test print comes out wrong, this is almost always the cause.
Method 5: How to Print a Booklet in Word Without Automatic Duplex
If your printer doesn’t do automatic double-sided printing, you can still produce a perfect booklet — Word walks you through it step by step. It prints all the front sides first, pauses, then waits for you to reinsert the stack to print the back sides.
Steps for Manual Duplex Printing
- Press Ctrl + P.
- Under the duplex dropdown, select Manually Print on Both Sides.
- Click Print — Word prints every front side.
- When Word prompts you, take the printed stack out of the output tray.
- Reinsert it into the paper feed — orientation depends on your printer (most need the printed side face-down, top edge feeding in first).
- Click OK in the Word prompt to continue.
? Always do a 2-page test print first — printers vary on which way the paper needs to be reinserted, and one test sheet is cheaper than ruining a 40-page booklet.
Which Method Should You Use?
| Method | Best For | Speed |
|---|---|---|
| Book Fold Layout | Setting up any booklet — the essential first step | Instant |
| Gutter Margin | Keeping content readable near the fold | Instant |
| Paper Size | Matching your printer and final booklet dimensions | Instant |
| Automatic Duplex Print | Printers that support double-sided printing | Fastest |
| Manual Duplex Print | Older or single-sided printers | Slower — needs a paper flip mid-print |
? Methods 1–3 are setup steps you run once per booklet. Methods 4 and 5 are alternatives — pick whichever your printer supports.
Common Problems When Printing a Booklet in Word
Text Disappearing Into the Fold
Your gutter margin is too small. Go to Layout ? Margins ? Custom Margins and increase the Gutter value to at least 0.5″. For booklets over 30 pages, bump it to 0.7″ or 0.8″ — the thicker the booklet, the more the fold eats into your content.
Pages Print Out of Order
Book Fold layout isn’t enabled. Open Layout ? Margins ? Custom Margins, check Multiple Pages is set to Book fold, and try again. Without this setting, Word prints pages sequentially and nothing folds correctly.
Back Pages Are Upside Down
You’ve set the duplex flip to long edge instead of short edge. In the Print dialog, change the setting to Flip pages on short edge. This is the most common booklet printing error.
Manual Duplex Reinsertion Comes Out Wrong
Printers vary on whether reinserted paper goes face-up or face-down, and which edge feeds first. Print a 2-page test, mark the top of the first sheet with an arrow before reinserting, and note what works for your specific printer. Save the setting in your head for next time.
Pro Tips for Professional-Looking Booklets
- Always do a 2-page test print before committing the full booklet — saves paper and reveals duplex orientation issues early.
- Keep the total page count a multiple of 4. Book Fold needs 4 pages per sheet — if you’ve got 13 pages of content, add three blank pages or your booklet will end mid-page.
- Add page numbers in the footer so the booklet stays usable after folding — see the guide on how to insert page numbers in Word for the cleanest method.
- Use 100gsm paper or heavier for booklets that need to last — standard 80gsm copier paper feels flimsy once folded.
- Pair the booklet with a table of contents in Word if it’s a manual or reference document — readers need to find their way around.
- Keep important content at least 0.5″ from any edge — printers often have an unprintable border zone that varies by model.
FAQs
How do I print a booklet in Word?
To print a booklet in Word, go to Layout ? Margins ? Custom Margins, set Multiple Pages to Book fold, adjust the gutter to 0.5″, then press Ctrl + P and select Print on Both Sides ? Flip pages on short edge. Word reorders the pages automatically.
Can I print a booklet on any printer?
Yes. Printers with automatic duplex make it faster, but any printer works — for single-sided printers, choose Manually Print on Both Sides and Word will prompt you to reinsert the paper halfway through.
What paper size is best for booklet printing in Word?
A4 is the most common — it folds into an A5 booklet, which is the standard size for manuals and brochures. Letter (8.5″ × 11″) works for US printers and folds into a half-letter booklet.
Why does Word rearrange my pages when I enable Book Fold?
That’s how booklet printing works — when you fold a stack of paper in half, page 1 sits opposite the last page, page 2 opposite the second-last, and so on. Word reshuffles the order automatically so the booklet reads correctly after folding.
How big should the gutter be for a booklet?
0.5″ (1.27 cm) works for most booklets up to 30 pages. Bump it to 0.7″–0.8″ for thicker booklets — the fold takes up more space as the paper count grows.
Do I need special software to print a booklet?
No. Microsoft Word handles booklet printing natively — Book Fold layout plus the duplex print setting is everything you need.
Why are my back pages printing upside down?
Your duplex setting is on Flip pages on long edge. Change it to Flip pages on short edge in the Print dialog and the back pages will print the right way up.
Conclusion
Once you’ve set Book Fold layout, adjusted the gutter, and locked in the flip-on-short-edge duplex setting, you can print a booklet in Word in under three minutes. The only thing left is folding the stack and stapling the spine — Word handles every bit of the page reordering for you.
Get the booklet layout right, then refine the rest of the document — a clean table of contents in Word at the front of a booklet turns a stack of pages into a proper reference document readers can actually navigate.
Related Tutorials
- How to Adjust Margins in Word
- How to Insert Page Numbers in Word
- How to Create a Table of Contents in Word

Recent Microsoft Word Tutorials

Looking for more help with Microsoft Word? Browse all step-by-step Word tutorials covering formatting, layout, pages, and document setup.
? View all Microsoft Word tutorials: https://wordmadeeasy.halmanweb.com/microsoft-word/
? Need more support – check out the official guidance: https://support.microsoft.com/en-au

Prefer watching instead of reading? Many Word tutorials are also available as short, step-by-step videos on the Word Made Easy YouTube channel.