To merge cells in Word, select the cells you want to combine and use either the right-click menu or the Table Layout tab — both take seconds and the result is identical. If you need to reverse it, Word’s Split Cells option restores the original structure. For more on working with tables, see the guide on how to delete a row in a table in Word.
In this guide, you’ll learn three methods to merge and split cells in Word, when to use each one, and how to fix the most common problems.
What Does Merging Cells Mean in Word?
Merging cells combines two or more adjacent table cells into a single larger cell. The border between them is removed and the content from all selected cells is carried into the merged result.
Common uses include:
- Table titles and header rows spanning multiple columns
- Category labels and group headings in reports
- Larger input areas in form layouts
- Schedules and calendars with grouped time blocks
- Invoice and contract templates with custom cell sizing
Watch the Video Tutorial
If you prefer to see this in action, the full video walkthrough is below, showing each method step by step.
How to Merge Cells in Word: Step-by-Step
There are two ways to merge cells and a third method to split them back. All three use built-in Word tools with no add-ins required.
Method 1: How to Merge Cells in Word Using Right-Click
The right-click context menu is the fastest route — no need to navigate to the ribbon. This is the best choice for quick, occasional merges.
Steps:
- Click inside your table, then click and drag to select the cells you want to merge.
- Right-click the selected cells.
- Click Merge Cells from the context menu.
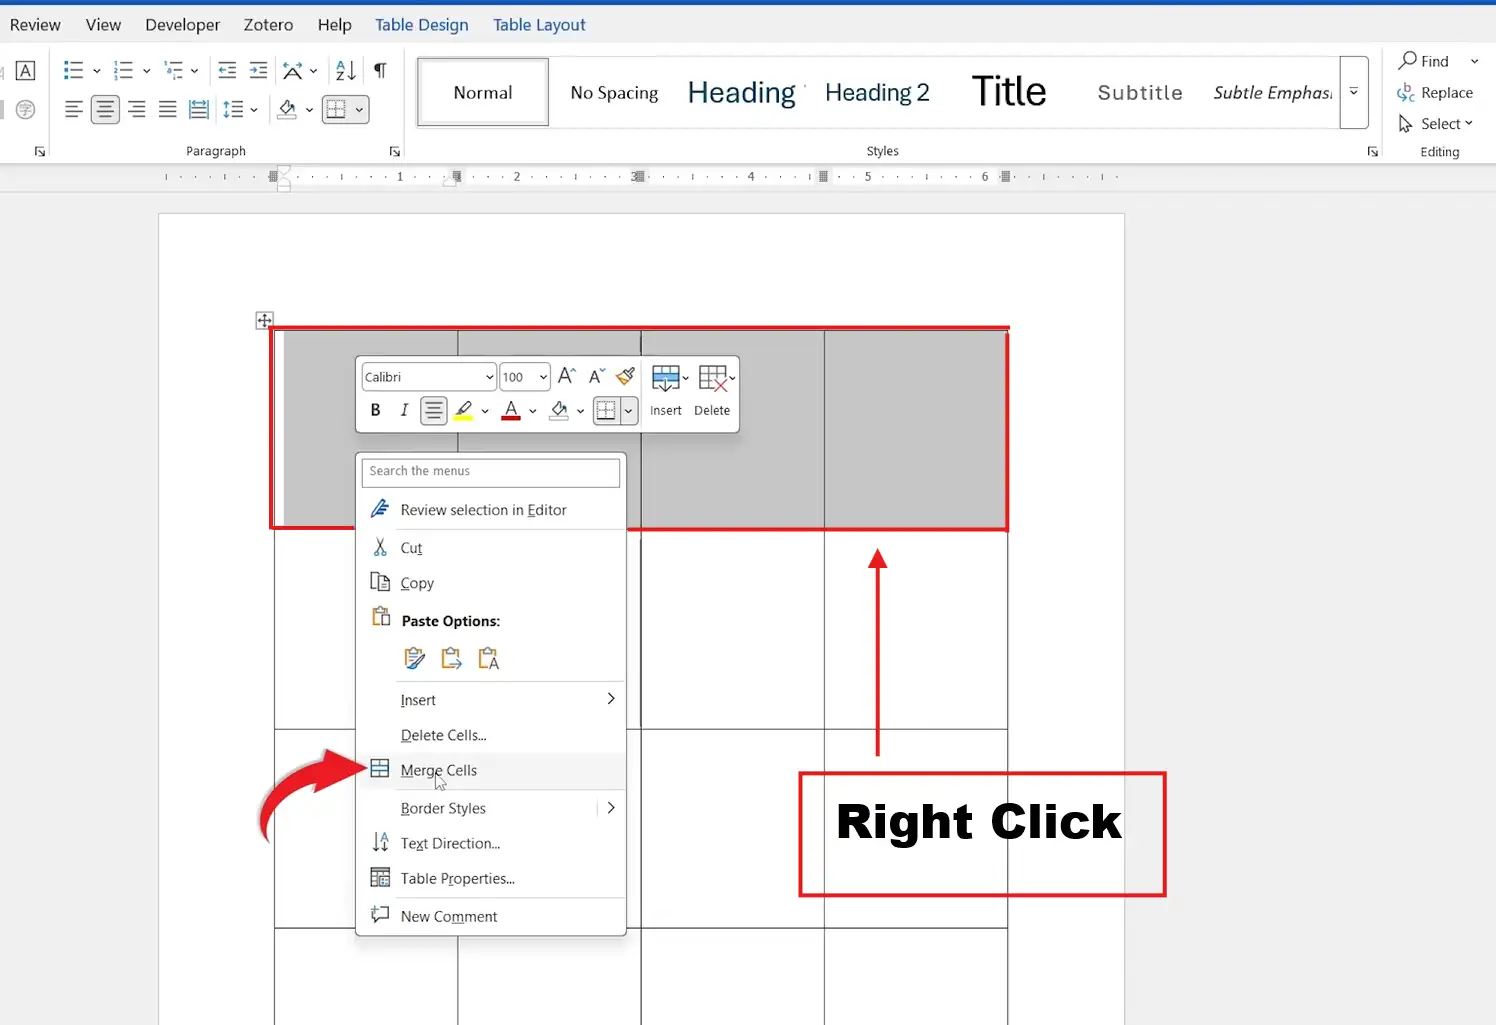
? The selected cells immediately combine into one larger cell. Any text from each cell is carried into the merged result, separated by paragraph breaks.
Method 2: How to Merge Cells in Word Using the Table Layout Tab
The Table Layout tab keeps all merge and split controls in one place — useful when you’re doing multiple table edits in the same session and want quick access to cell alignment, row height, and split options alongside the merge command.
Steps:
- Select the cells you want to combine by clicking and dragging across them.
- Click the Table Layout tab (appears in the ribbon when a table is selected).
- In the Merge group, click Merge Cells.
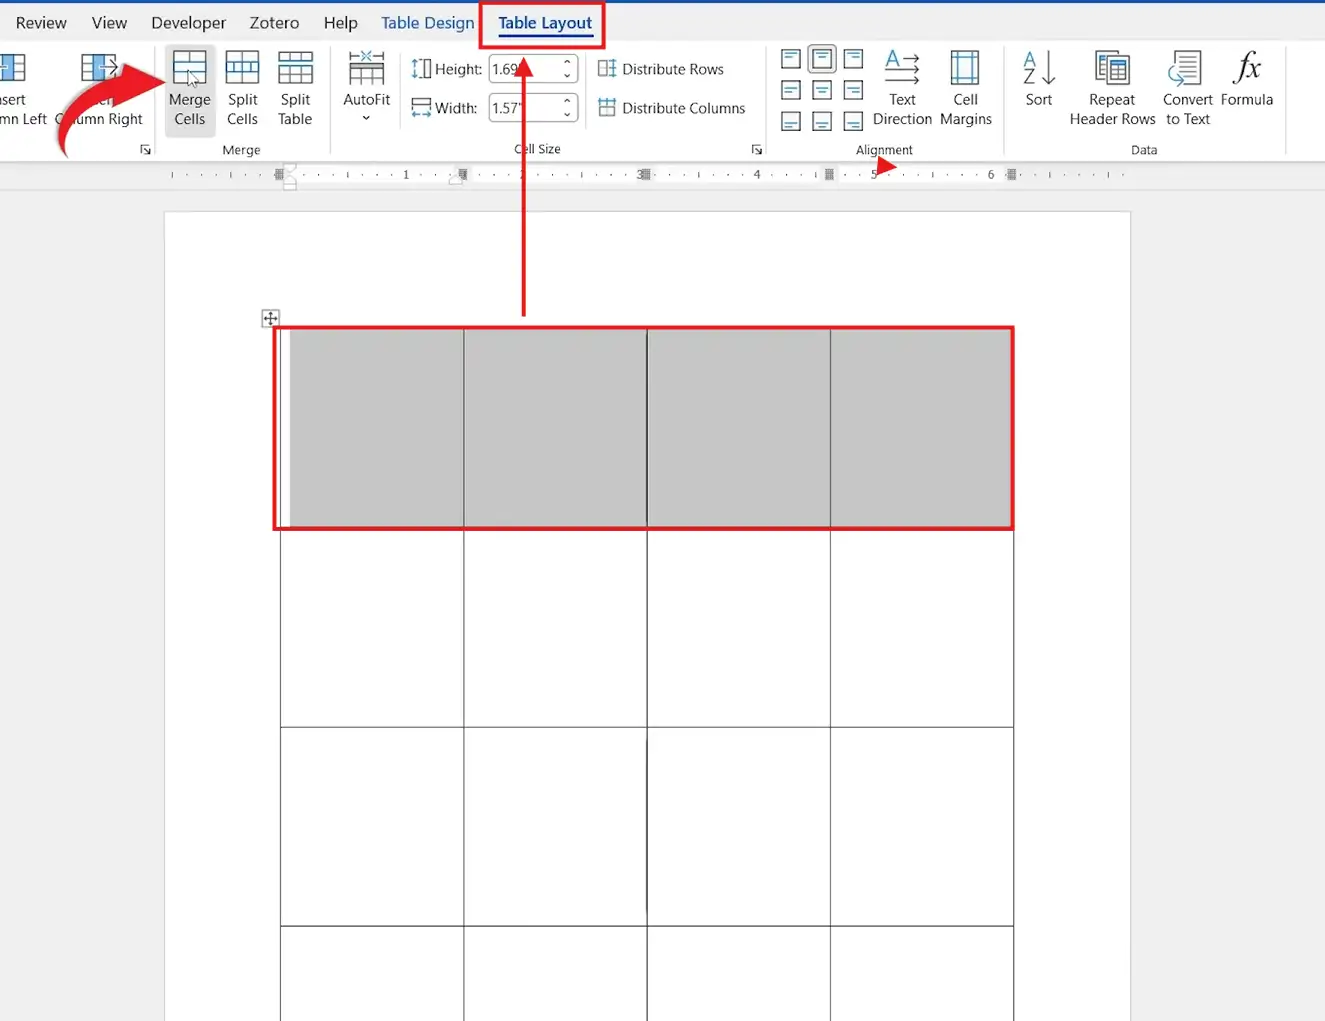
? The selected cells merge instantly. The Table Layout tab also gives you immediate access to Split Cells, Split Table, and cell alignment controls — for more on controlling table structure, see the guide on how to hide table lines in Word.
Method 3: How to Split Merged Cells in Word
If you need to reverse a merge — whether you merged by mistake or the table layout needs to change — Word gives you two options: Undo (for immediate reversal) or Split Cells (for reversing merges made in earlier editing sessions).
Option A: Undo the Merge
- Immediately after merging, press Ctrl + Z.
? Word reverses the merge and restores the original cells. This only works before you save or close the document.
Option B: Use Split Cells
- Click inside the merged cell.
- Click the Table Layout tab.
- Click Split Cells in the Merge group.
- Enter the number of columns and rows you want to restore.
- Click OK.
? The merged cell divides back into individual cells. If four cells were originally merged into one, enter 4 columns and 1 row to restore the original structure.
Which Method Should You Use?
- Quick one-off merge? Use Method 1 — right-click is the fastest option without leaving the table.
- Doing multiple table edits at once? Use Method 2 — the Table Layout tab keeps split, merge, and alignment tools all in one place.
- Need to reverse a merge? Use Method 3 — Undo for immediate reversal, Split Cells for merges made in earlier sessions.
Common Problems When Merging Cells in Word
Merge Cells Option Is Greyed Out
The Merge Cells command only activates when two or more adjacent cells are selected. If you’ve clicked inside a single cell without dragging to select additional cells, the option will be unavailable — click and drag across at least two cells before right-clicking or using the ribbon.
Cannot Merge Non-Adjacent Cells
Word only merges cells that share a border. You cannot merge cells from different rows that don’t connect, or skip cells in the middle of a selection. If you need a similar visual effect across non-adjacent areas, consider using nested tables or adjusting column widths instead.
Formatting Changes After Merging
When cells with different formatting are merged, Word applies the formatting of the first selected cell to the entire merged result. If borders, shading, or alignment look wrong after merging, select the merged cell and reapply your preferred settings from the Table Design and Table Layout tabs.
Text Doesn’t Align Properly After Merging
After merging, text defaults to the top-left of the new cell. To reposition it, click inside the merged cell, go to the Table Layout tab, and use the Alignment group buttons to set horizontal and vertical alignment independently — centre-aligned headings typically use the middle-centre option.
Pro Tips for Merging Cells in Word
- Merge before you add content. Merging empty cells is cleaner than merging cells that already contain text — merging populated cells concatenates all content with paragraph breaks between them, which usually requires manual cleanup.
- Use merged header rows to span all columns. Select the entire top row and merge all cells to create a single title cell that stretches the full width of the table — this is the standard approach for labelled report and invoice tables.
- Don’t overuse merging in data tables. Merged cells can break sorting and accessibility tools. For tables that will be converted to Excel or read by screen readers, keep the cell structure as uniform as possible.
- Combine with shading for visual hierarchy. After merging a header row, apply a background colour via Table Design ? Shading to make the merged cell stand out — for more on table styling, see the guide on how to remove gridlines in Word.
FAQs
How do I merge cells in Word?
Select the cells you want to combine, then either right-click and choose Merge Cells, or go to Table Layout ? Merge Cells on the ribbon. Both produce the same result.
Can I merge an entire row in Word?
Yes. Click the first cell in the row, hold Shift, and click the last cell to select the full row, then choose Merge Cells. The entire row becomes a single cell.
How do I split merged cells back into columns?
Click inside the merged cell, go to Table Layout ? Split Cells, enter the number of columns (and rows if needed), and click OK.
Why is the Merge Cells option greyed out?
You must have two or more adjacent cells selected. Click and drag across the cells you want to merge — clicking inside a single cell won’t activate the option.
Will merging cells delete my data?
No. Word keeps all content from each merged cell and combines it into the new cell, with paragraph breaks separating the original entries. Clean up any unwanted text after merging.
Can I merge cells in Word Online?
Yes. Select the cells, right-click, and choose Merge Cells. Word Online supports the basic merge and split functions, though some Table Layout tab options may differ from the desktop app.
Is there a keyboard shortcut to merge cells in Word?
There’s no dedicated shortcut. The fastest keyboard-friendly route is to select cells using Shift + arrow keys, then open the context menu with Shift + F10 and navigate to Merge Cells.
Conclusion
Merging cells in Word is straightforward: select the cells, right-click and choose Merge Cells, or use the Table Layout tab for the same result with access to split and alignment controls alongside it.
The Split Cells option means no merge is permanent — you can always divide a merged cell back into its original structure. Merge empty cells before adding content where possible to avoid text concatenation cleanup.
Once your table structure is set, the next step is usually fine-tuning how it looks — the guide on how to hide table lines in Word covers exactly how to control which borders are visible and which are hidden.
Related Tutorials
- How to Delete a Row in a Table in Word
- How to Hide Table Lines in Word
- How to Remove Gridlines in Word

Recent Microsoft Word Tutorials

Looking for more help with Microsoft Word? Browse all step-by-step Word tutorials covering formatting, layout, pages, and document setup.
? View all Microsoft Word tutorials: https://wordmadeeasy.halmanweb.com/microsoft-word/
? Need more support – check out the official guidance: https://support.microsoft.com/en-au

Prefer watching instead of reading? Many Word tutorials are also available as short, step-by-step videos on the Word Made Easy YouTube channel.